

Indulge in Homemade Cookies and Cream Ice Cream: A Sweet Journey
There’s nothing quite like the feeling of a scoop of creamy, dreamy ice cream slowly melting in your mouth on a hot summer day. It takes me back to my childhood, where I’d eagerly await the ice cream truck’s jingle signaling its arrival in our neighborhood. My friends and I would scramble, coins clinking in our pockets, running down the street to snag our favorite treats. While many of my friends chose fruity popsicles or rainbow sherbets, I was always about that classic Cookies and Cream. The luscious blend of rich creaminess mixed with crunchy chocolate cookie bits made it my absolute favorite.
Creating ice cream at home was a game-changer for me. Not only could I tailor it to my specific cravings, but I could do it with a sense of pride, knowing every ingredient that went into it! The first time I made my version of Cookies and Cream Ice Cream, the whole house filled with the sweet aroma of vanilla and chocolate—it was like a warm hug from my kitchen. The memory of that first successful batch is etched in my mind, and I still make it often, especially when people are coming over or when I need a simple pick-me-up after a long day.
So, grab your favorite ice cream scoop and let’s dive into making this delightful treat together! Trust me; you’re going to love how easy it is, and your homemade ice cream will taste way better than anything you can get from the store.
Ingredients
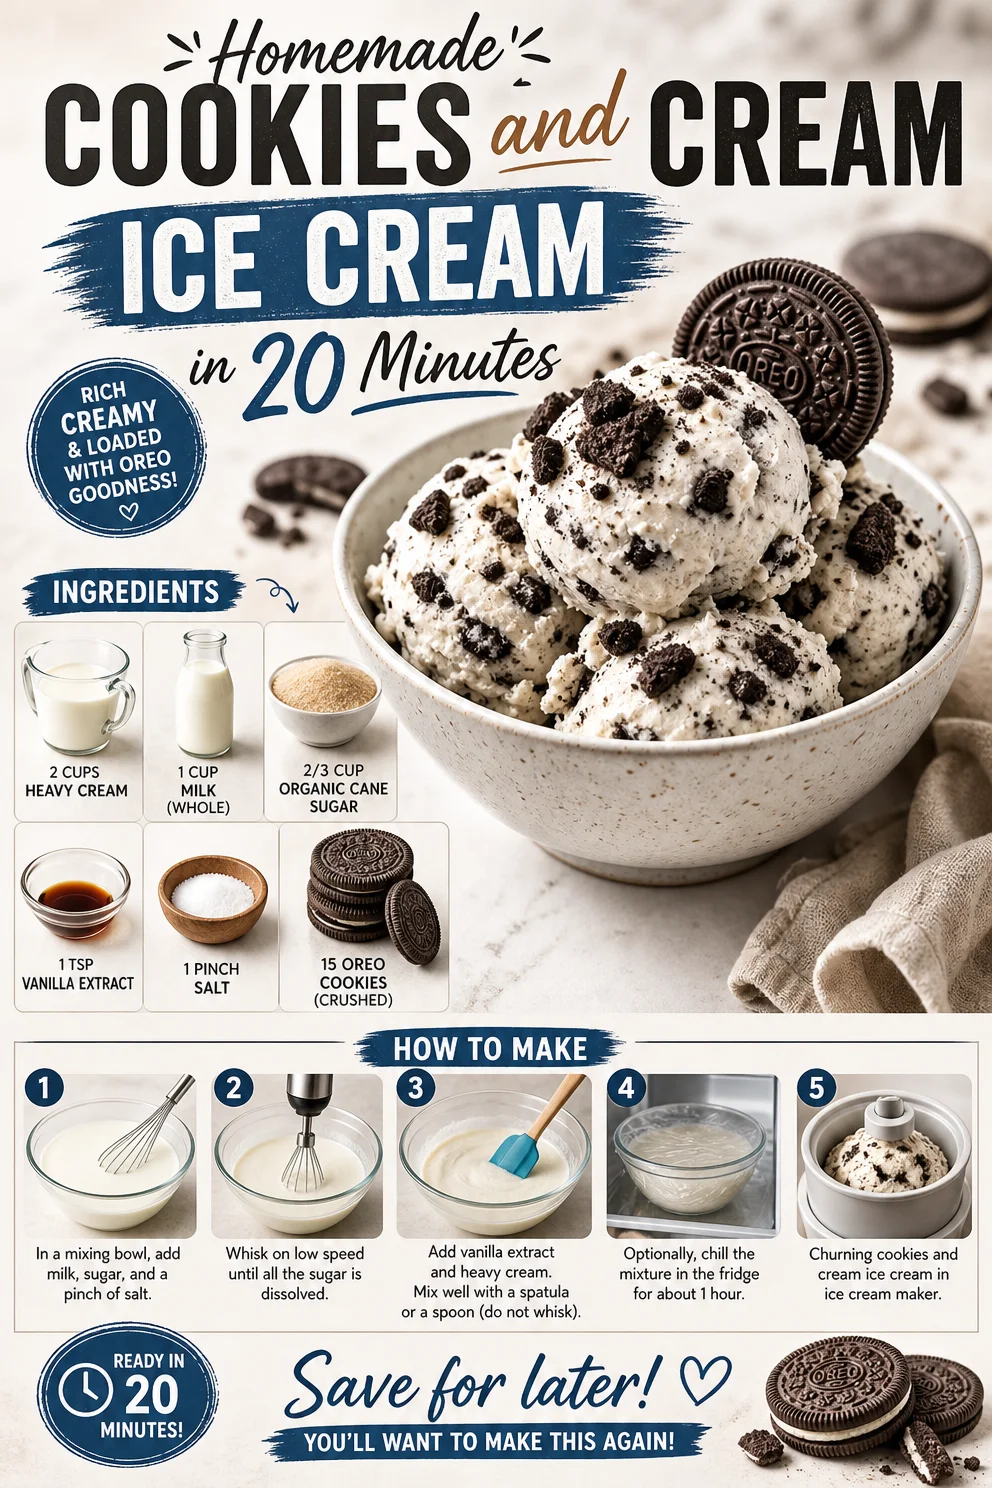
Here’s what you’ll need for this delectable Cookies and Cream Ice Cream:
-
2 cups Heavy cream
Why Heavy Cream? This is what gives our ice cream that luxurious, rich texture! If you want to cut down on calories, you can use a mix of half-and-half and heavy cream, but trust me, the richness is worth it! -
1 cup Milk (whole)
Milk Matters! Whole milk provides the creaminess necessary for a smooth base. If you’re after a lower-fat option, you could swap in 2% milk, but the texture won’t be quite the same. -
2/3 cup Organic cane sugar
Sweetness is Key! This sugar dissolves beautifully, giving your ice cream that perfect sweetness. If you’re looking for alternatives, powdered sugar can work too for a smoother blend, but keep an eye on the sweetness level! -
1 tsp Vanilla extract
Vanilla Magic! This elevates the flavor of your ice cream. If you really want to impress, consider using a high-quality vanilla bean paste for a more robust flavor profile! -
1 pinch Salt
The Secret Ingredient! Salt balances the sweetness and enhances all the flavors. Just a small pinch goes a long way! -
15 Oreo cookies (crushed)
Oreo Goodness! The classic chocolate sandwich cookies are what make this ice cream truly special. Feel free to use any chocolate sandwich cookie you adore! Gluten-free or vegan versions are also great swaps.
With these ingredients on hand, you’re just a few steps away from creating a dreamy, creamy dessert!
Step-by-Step Instructions
Let’s make this deliciousness happen! Here’s how to whip up your Cookies and Cream Ice Cream in no time.
-
Mix the Base: In a large mixing bowl, combine the heavy cream, milk, sugar, vanilla extract, and salt. Use a whisk to mix everything together until the sugar is fully dissolved. Tip: If you prefer a richer flavor, let the mixture sit in the fridge for about 30 minutes before churning to let the flavors meld.
-
Churn the Ice Cream: Once you have your silky base, pour the mixture into your ice cream maker. Follow your machine’s instructions for the churning process. Generally, it takes about 20-25 minutes for the ice cream to reach soft-serve consistency. Chef Hack: If you don’t have an ice cream maker, don’t stress! You can pour the mixture into a freezer-safe bowl and whisk it every 30 minutes until it firms up.
-
Fold in the Oreo Cookies: Once your ice cream reaches that luscious, creamy texture, take it out of the machine. Gently fold in the crushed Oreo cookies, making sure they’re evenly distributed throughout the mixture. Pro Tip: Reserve a few chunks to sprinkle on top when serving—presentation matters!
-
Freeze it Up: Transfer your ice cream to a freezer-safe container and smooth the top with a spatula. Cover it tightly and freeze for at least 4 hours, or overnight for the best results. Insider Tip: To make scooping easier later, lay a piece of parchment paper directly on top of the ice cream before sealing it!
-
Scoop and Serve: After it’s frozen, allow your homemade ice cream to sit at room temperature for about 5–10 minutes before trying to scoop it out. This short wait makes a world of difference!
Serving Suggestions
Serving your Cookies and Cream Ice Cream is an art in itself! I love to scoop it into chilled bowls or waffle cones, perhaps topping them with some extra crushed Oreos or a drizzle of chocolate sauce for an indulgent touch. If you’re feeling fancy, a dollop of whipped cream always makes the dessert feel a bit more celebratory! Don’t forget to grab some cute spoons—after all, we’re making sweet memories here!
Recipe Variations
If you’re looking to switch things up, here are a few fun twists on this Cookies and Cream Ice Cream:
-
Minty Fresh: Add a teaspoon of peppermint extract for a refreshing mint cookies and cream flavor!
-
Nutty Delight: Incorporate crushed nuts (like almonds or pecans) for an added crunch and a nutty flavor.
-
Chocolate Lovers’ Dream: Mix in some chocolate chips alongside the Oreos for an extra chocolatey experience.
-
Vegan Option: Substitute heavy cream with coconut cream and use a non-dairy milk. Replace Oreos with a vegan chocolate sandwich cookie.
-
Coffee Kick: Add a tablespoon of espresso powder for a delicious mocha cookies and cream!
Chef’s Notes
Every recipe has its tale, and this ice cream is no different. The beauty of making ice cream at home is the ability to play with flavors and textures. I remember one time, I got a little adventurous and added peanut butter to the base, blending it in right after the milk and cream. Let’s just say—an instant hit! My friends couldn’t get enough of that unique twist of chocolate and nutty goodness.
Over time, I’ve discovered how simple changes can create a whole new experience. That’s the magic of cooking!
FAQs and Troubleshooting
Here are some common questions and potential pitfalls you might encounter while making your Cookies and Cream Ice Cream:
-
Why isn’t my ice cream freezing? Check that your ice cream maker bowl is properly frozen. It typically requires at least 24 hours in the freezer before use.
-
My ice cream turned out too hard? If your ice cream is rock solid, allow it to soften at room temperature for a few minutes before serving. If it continues to freeze too hard each time, consider adding more cream to the base next time for creamier results.
-
Can I add mix-ins during churning? Yes, feel free to add mix-ins like chocolate chips or nuts in the last five minutes of churning for even distribution.
-
How long does homemade ice cream last? It’s best enjoyed within 1-2 weeks for maximum freshness, though it can last longer if stored correctly!
Conclusion
There you have it—a delightful journey into making your very own Cookies and Cream Ice Cream! I hope this recipe inspires you to jump into the kitchen and whip up something delicious. Remember, the heart of cooking is in the joy of sharing, whether with family, friends, or simply treating yourself after a long day. Let’s celebrate everyday moments, and what better way to do that than with a bowl of homemade ice cream?
Enjoy every scoop, and don’t forget to make some sweet memories along the way! I can’t wait to hear how your own ice cream adventure turns out! Grab your spoons, and let’s dig in!
PrintHomemade Cookies and Cream Ice Cream

A delightful and creamy recipe for homemade Cookies and Cream Ice Cream, perfect for hot summer days.
- Prep Time: 15 minutes
- Cook Time: 25 minutes
- Total Time: 240 minutes
- Yield: 6 servings 1x
- Category: Dessert
- Method: Churning
- Cuisine: American
- Diet: Vegetarian
Ingredients
- 2 cups Heavy cream
- 1 cup Whole milk
- 2/3 cup Organic cane sugar
- 1 tsp Vanilla extract
- 1 pinch Salt
- 15 Oreo cookies (crushed)
Instructions
- Mix the base: In a large mixing bowl, combine the heavy cream, milk, sugar, vanilla extract, and salt. Whisk until the sugar is fully dissolved.
- Churn the ice cream: Pour the mixture into your ice cream maker and follow the manufacturer’s instructions, usually taking about 20-25 minutes.
- Fold in the Oreo cookies: Gently fold in the crushed cookies until evenly distributed.
- Freeze it up: Transfer to a freezer-safe container, smooth the top, and freeze for at least 4 hours.
- Scoop and serve: Let sit at room temperature for 5-10 minutes before scooping.
Notes
For a richer flavor, chill the mixture in the fridge for about 30 minutes before churning. Consider toppings like extra crushed Oreos or chocolate sauce when serving.
Nutrition
- Serving Size: 1 serving
- Calories: 250
- Sugar: 20g
- Sodium: 80mg
- Fat: 18g
- Saturated Fat: 10g
- Unsaturated Fat: 6g
- Trans Fat: 0g
- Carbohydrates: 23g
- Fiber: 1g
- Protein: 3g
- Cholesterol: 50mg
Keywords: ice cream, cookies and cream, dessert, homemade ice cream