
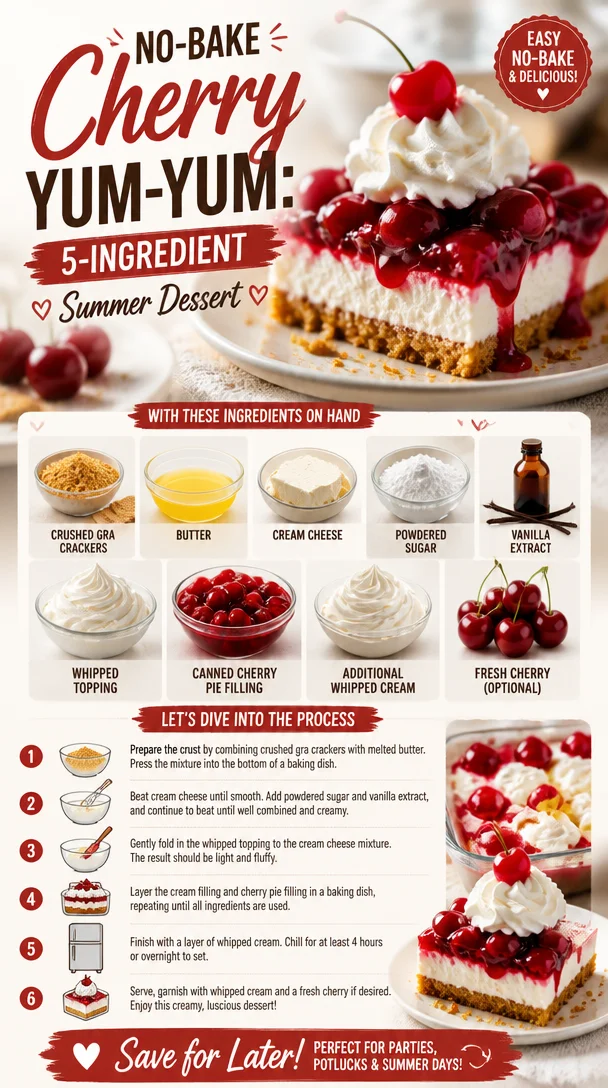
The No-Bake Cherry Yum Yum: A Dessert That Delivers Delight
Hey there, fellow food lovers! Today, I’m thrilled to share one of my all-time favorite recipes — the No-Bake Cherry Yum Yum. If you’re anything like me, you appreciate a dessert that’s not only delicious but also quick and easy to whip up. This dessert checks all those boxes, plus it takes you back to those nostalgic summer days filled with family gatherings and sweet treats. Are you ready to dive in? Let’s get started!
A Slice of Memories
Let me take you back to a sunny afternoon in my childhood. I was at my grandmother’s house, where the scent of something sweet wafted through the air. It was summertime, and my cousins and I were running around outside, our laughter mingling with the sound of a crackling BBQ while my grandma worked her magic in the kitchen. She often made this No-Bake Cherry Yum Yum, a dessert that was as cheerful as our summer vibes.
I remember her sliding generous squares of the cherry delight onto our paper plates and watching us devour it with glee, our faces smeared with whipped cream and cherry filling. It wasn’t just dessert; it was the essence of family, laughter, and those carefree summer days filled with sunshine. Now, as an adult, whenever I make this dessert, I’m transported back to that kitchen, those warm memories flooding in. It’s not just a recipe; it’s a journey down memory lane.
Ingredients
Let’s gather our troops — the star players that will come together to create this delectable No-Bake Cherry Yum Yum:
-
Crushed Graham Crackers:
These little gems form the delicious base of the dessert. They add a subtle sweetness and a delightful crunch. You could also use digestive biscuits or even vanilla wafer cookies for a fun twist! -
Butter:
We’ll need melted butter to help bind the graham cracker crust together, making it all come together perfectly. If you want to lighten it up a bit, you can substitute half the butter with applesauce. -
Cream Cheese:
Creamy and tangy, cream cheese adds that rich texture we crave in desserts. Make sure to let it soften to room temperature for easier mixing. If you’re looking for a lighter version, whipped ricotta can also work wonders. -
Powdered Sugar:
This ingredient sweetens the cream cheese layer to perfection. The fine texture blends seamlessly, avoiding any gritty bits. Feel free to reduce the sugar to taste if you’re monitoring your sweetness! -
Vanilla Extract:
A splash of vanilla extract enhances the overall flavor, imparting warmth and depth. If you’re feeling adventurous, try using almond extract for a different flavor profile. -
Whipped Topping:
Fluffy and light, whipped topping adds a creamy texture and lightens the overall dessert. For a homemade version, whip up some heavy cream and add a bit of sugar! -
Canned Cherry Pie Filling:
Ah, the crown jewel! Drizzle this luscious cherry filling over the dessert for that classic taste. You can substitute it with homemade cherry compote if you’re feeling creative. -
Additional Whipped Cream:
Use this for garnish, adding an extra touch of indulgence — because who doesn’t love a bit more whipped cream?
Step-by-Step Instructions
Alright, let’s roll up our sleeves and make some magic happen in the kitchen! Here’s how to create this yummy dessert step-by-step:
-
Prepare the Graham Cracker Crust:
In a medium bowl, combine the crushed graham crackers with melted butter. Mix until everything is well coated. You want the mixture to resemble wet sand. If it’s too crumbly, a little more melted butter can help it come together. -
Press the Crust Into a Pan:
Grab your 9×9-inch baking dish (or any similar size will do). Use a measuring cup or your hands to press the graham cracker mixture into the bottom of the dish, making sure it’s packed tightly. This is the foundation of your yum yum! Pop it into the fridge while you prepare the filling. -
Mix the Cream Cheese Layer:
In another bowl, beat the softened cream cheese until smooth. Gradually add the powdered sugar and vanilla extract, mixing until well blended. It should be creamy and luscious. A secret hack? Use an electric mixer for fluffier results! -
Fold in the Whipped Topping:
This step transforms your cream cheese mixture into a dreamy, light cloud. Fold in your whipped topping gently; you want to keep all that airiness intact. The mixture should be smooth and fluffy by now. -
Spread the Cream Cheese Mixture:
Take your crust out of the fridge and spread the cream cheese mixture over it evenly. Use a spatula to smooth out the surface — it doesn’t need to be perfect; we’re going for charming here! -
Top with Cherry Filling:
Now, for the pièce de résistance! Spoon the canned cherry pie filling over the cream cheese layer, spreading it out with a gentle hand. You want those cherries to stand out and shine. -
Chill to Combine:
Pop the dessert back in the fridge and let it chill for at least 2 hours, or until you’re ready to serve. Patience may be a virtue, but trust me, it’s well worth the wait!
Serving Suggestions
When it’s time to serve your No-Bake Cherry Yum Yum, cut it into squares and plate them up with a dollop of additional whipped cream on top. A sprig of mint can add a pop of color too! This makes for a beautiful presentation that will impress your friends and family.
Recipe Variations
Looking to switch things up? Here are some creative twists to keep your Yum Yum exciting:
-
Berry Medley: Replace the cherry filling with a mix of blueberries and raspberries for a refreshing summer delight.
-
Chocolate Lovers: Add some cocoa powder to the cream cheese mixture for a chocolatey twist, and top with strawberries or chocolate sauce instead of cherries.
-
Nutty Crunch: Stir in chopped nuts into the crust for added texture — pecans or almonds work great!
-
Coconut Cream Yum Yum: Mix toasted coconut into your cream cheese layer and use a coconut cherry topping for a tropical vibe.
Chef’s Notes
Can I share a funny kitchen story? Well, the first time I made this dessert for my friends, I was too eager and didn’t let it chill enough. I served it semi-set and everyone got a chuckle as the squares wobbled on their plates! Lesson learned: patience really is key in the kitchen. Over time, I’ve also learned that this dessert can be dressed up or down depending on the occasion. Perfect for casual get-togethers or elegant dinner parties!
FAQs and Troubleshooting
1. Can I use fresh cherries instead of canned?
Absolutely! If you’re going Fresh Cherry route, make sure to pit and slice them first. Toss them with a little sugar to draw out their juices and enhance their sweetness.
2. What if my whipped topping didn’t hold its shape?
If your whipped topping deflates, it may mean it wasn’t whipped enough. Make sure to whip until stiff peaks form. If you’re making it from scratch, chill your bowl and beaters beforehand!
3. Can I make this dessert ahead of time?
You bet! The No-Bake Cherry Yum Yum can be made a day in advance, making it a perfect candidate for meal prep or parties. Just cover it with plastic wrap after chilling.
4. How long will leftovers last in the fridge?
Stored in an airtight container, it should stay fresh for about 3-4 days. Keep an eye on that whipped cream; it might start to lose its fluffiness!
This No-Bake Cherry Yum Yum captures the essence of summer and makes any day feel like a celebration. It’s a recipe that brings joy, laughter, and scrumptious flavors together in one delightful dessert. So, gather your ingredients, grab your favorite pan, and let’s create something sweet that feels like home. Enjoy every bite — and don’t forget to take a moment to appreciate the memories that come with it. Happy cooking, friends!
PrintNo-Bake Cherry Yum Yum
A quick and easy dessert that combines a delicious graham cracker crust with cream cheese and cherry pie filling.
- Prep Time: 15 minutes
- Cook Time: 0 minutes
- Total Time: 120 minutes
- Yield: 8 servings 1x
- Category: Dessert
- Method: No-Bake
- Cuisine: American
- Diet: Vegetarian
Ingredients
- 1 1/2 cups crushed graham crackers
- 1/2 cup melted butter
- 8 oz cream cheese, softened
- 1 cup powdered sugar
- 1 tsp vanilla extract
- 2 cups whipped topping
- 1 can cherry pie filling
- Additional whipped cream for garnish
Instructions
- Prepare the Graham Cracker Crust: In a medium bowl, combine the crushed graham crackers with melted butter. Mix until everything is well coated.
- Press the Crust Into a Pan: Use a measuring cup or your hands to press the graham cracker mixture into the bottom of the dish.
- Mix the Cream Cheese Layer: In another bowl, beat the softened cream cheese until smooth. Gradually add the powdered sugar and vanilla extract.
- Fold in the Whipped Topping: Fold in your whipped topping gently until the mixture is smooth and fluffy.
- Spread the Cream Cheese Mixture: Take your crust out of the fridge and spread the cream cheese mixture over it evenly.
- Top with Cherry Filling: Spoon the canned cherry pie filling over the cream cheese layer.
- Chill to Combine: Let the dessert chill in the fridge for at least 2 hours before serving.
Notes
For a lighter version, substitute half the butter with applesauce and use whipped ricotta instead of cream cheese. Can be made a day in advance.
Nutrition
- Serving Size: 1 square
- Calories: 300
- Sugar: 25g
- Sodium: 250mg
- Fat: 16g
- Saturated Fat: 8g
- Unsaturated Fat: 6g
- Trans Fat: 0g
- Carbohydrates: 36g
- Fiber: 1g
- Protein: 4g
- Cholesterol: 30mg
Keywords: cherry, dessert, no-bake, summer, easy recipe