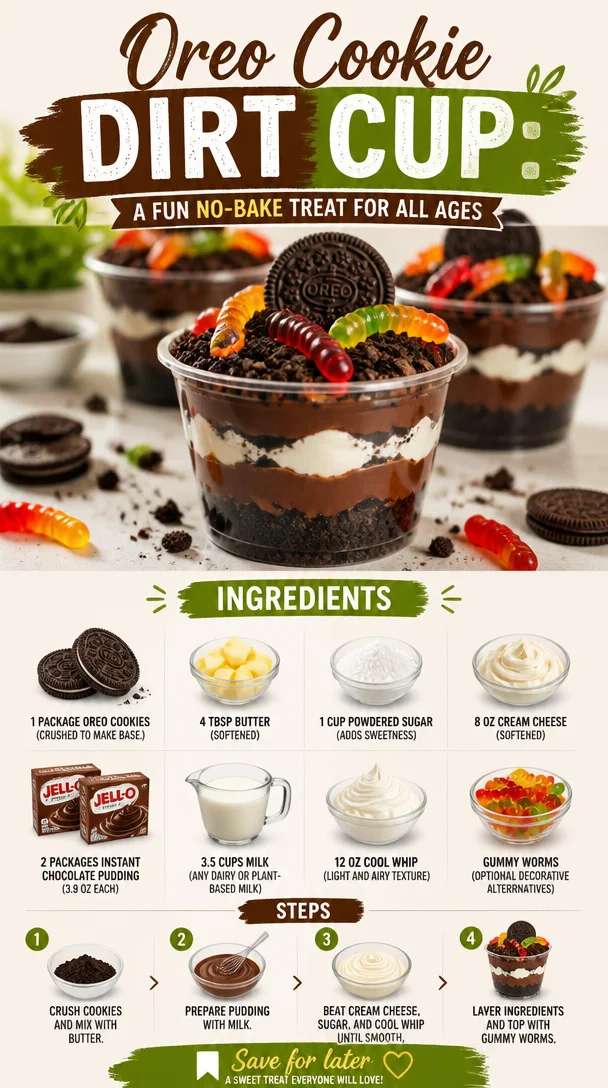
Oreo Cookie Dirt Cup: A Fun No-Bake Treat for All Ages
Welcome, sweet friends! Today, we’re diving into a classic childhood favorite that brings a smile to faces of all ages: the Oreo Cookie Dirt Cup! This delightful no-bake treat is perfect for parties, after-school snacks, or just because you’ve had a long day and deserve something sweet. With its creamy filling and crunchy Oreo base, this dessert is so easy to prepare that you can whip it up in no time at all. Plus, it comes with a delightful touch—we’ll toss in some gummy worms to make it as whimsical as it is delicious!
In this post, I’ll share not just the recipe but also some fun stories from my kitchen adventures, tips to make your dirt cup the best it can be, and yes, some fabulous serving suggestions. So grab your apron, let’s indulge that inner child, and create some dirt-cup magic!
A Walk Down Memory Lane: My First Oreo Dirt Cup
I’ll never forget the first time I had an Oreo Cookie Dirt Cup. I was at my best friend’s birthday party, and dessert was always the highlight of any celebration. As soon as I spotted those adorable plastic cups filled to the brim with crushed Oreos and creamy goodness, my heart did a little happy dance. They were so cute, decorated with gummy worms that seemed to wiggle with excitement. I remember waiting eagerly in line, my mouth watering as I watched the adults scoop this masterpiece into cups, trying to get the perfect Oreo-to-worm ratio.
When my turn finally arrived, my friend’s mom handed me a cup, and I took a big spoonful. The moment the chocolatey goodness hit my taste buds, I was sold! From that day forward, I begged my mom to make them for every special occasion. It became a tradition, and every time I take a bite of an Oreo Dirt Cup, I’m instantly taken back to those carefree days of childhood laughter, friendship, and pure joy. Today, I want to share that same excitement with you!
Ingredients: What You’ll Need
Let’s gather our ingredients to make this fantastic no-bake treat! Here’s what you’ll need:
-
1 package Oreo Cookies
The star of the show! You’ll want to crush these to create a crumbly base. Feel free to use double-stuffed Oreos for an extra creamy filling. -
4 tbsp Butter (Softened)
This helps bind the crushed cookies together for the base. If you’re looking for a butter substitute, coconut oil works beautifully and adds a tropical twist! -
1 cup Powdered Sugar
Adds sweetness and creaminess to the filling. For a healthier alternative, try organic powdered sugar or make your own by blending regular sugar until fine. -
8 oz Cream Cheese (Softened)
This gives the filling its rich and creamy texture. For a dairy-free version, switch to a vegan cream cheese or blended silken tofu. -
2 packages Instant Chocolate Pudding (3.9 oz each)
This mix will add that luscious chocolate flavor. You can also switch it up with vanilla pudding for a different take! -
3.5 cups Milk
Any kind of milk works here—dairy, almond, or oat milk. Just adjust the flavors of the pudding accordingly! -
12 oz Cool Whip
This gives our dirt cups that light and airy touch. You can opt for a dairy-free whipped topping, or even make your own if you’re feeling adventurous! -
Gummy Worms (Optional)
To top off your delicious creation! These can be swapped for other fun candies like gummy bears or chocolate-covered pretzels for added crunch.
Step-by-Step Instructions: Let’s Get Cooking!
Alright, time to get our hands dirty (figuratively speaking, of course)! Follow these steps to create your very own Oreo Dirt Cups:
-
Crush the Oreos:
Grab your food processor and pulse the Oreo cookies until finely crushed. If you don’t have a processor, place them in a large zip-top bag and smash them with a rolling pin! Set aside about 1 cup of crumbs for the topping and use the rest for your base. -
Prepare the Butter Mixture:
In a medium bowl, combine the crushed Oreos with the softened butter. Mix until the crumbs are well coated and resemble wet sand. This will be your yummy base! -
Create the Cream Cheese Filling:
In another large mixing bowl, beat the softened cream cheese using an electric mixer on medium speed until nice and smooth. Gradually add the powdered sugar, mixing until fully combined. You’ll want this to be creamy and fluffy—trust me, it’s worth it! -
Mix in the Pudding:
Now, add the two packages of instant chocolate pudding to your cream cheese mixture. Gradually stir in the milk until the pudding is fully incorporated and the mixture is silky smooth. This is where the magic happens! -
Fold in the Cool Whip:
Gently fold the Cool Whip into the pudding and cream cheese mixture. Take your time with this step, as you want to keep that light and fluffy texture. Because who wants a flat dirt cup? -
Assemble the Dirt Cups:
In your favorite cups or glasses, sprinkle a layer of the Oreo-butter mixture at the bottom. Follow this with a generous layer of the cream cheese pudding mixture. Keep layering until you reach the top! Finish with those reserved Oreo crumbs for that authentic “dirt” look. -
Top It Off:
Now, the fun part! Place gummy worms on top, letting them peek out like they’re crawling around in the dirt. Feel free to get creative with your garnishes—maybe crush some extra Oreos on top or add a drizzle of chocolate sauce! -
Chill:
Pop these beauties in the fridge for at least 1 hour to let them set. This also allows the flavors to meld together beautifully. Trust me, the wait is well worth it!
Serving Suggestions: How to Plate Your Dirt Cup
When it’s time to serve, you want your dirt cups to look as adorable as they taste! These are meant to be fun and whimsical, so don’t hold back. If you’re feeling fancy, add a sprig of mint on top for a pop of color or some edible flowers for a touch of elegance. Serve these cool cups on a colorful platter, and watch your guests’ faces light up with delight!
Recipe Variations: Get Creative!
Now, while the classic Oreo Dirt Cup is utterly delicious as is, there’s always room for creativity in the kitchen! Here are a few variations you can try:
-
Peanut Butter Delight: Swap out half of the cream cheese for creamy peanut butter for a tasty twist. It makes it rich and nutty—perfect for peanut butter lovers!
-
Cookie Butter Version: Replace Oreos with speculoos cookies (Biscoff) and use cookie butter instead of butter for a spicy, caramel twist.
-
Fruit Explosion: Mix in some fresh raspberries or strawberries into the pudding layer for a fruity burst. You can also top it off with fresh berries for an extra pop!
-
Spooky Twist: For Halloween, use black and orange sprinkles and gummy bats instead of worms to create a spooky dessert!
-
Vegan Dirt Cup: Use vegan cookies, coconut cream instead of Cool Whip, and almond or soy milk for a completely plant-based version that still hits all the right notes.
Chef’s Notes: The Heart of the Recipe
Over the years, I’ve made this recipe countless times, and it never fails to bring back those warm childhood memories. My niece and nephew love getting involved in the kitchen and crushing the Oreos to make their “dirt.” It’s such a joy to transform an easy dessert into a bonding experience. You know, this recipe has seen its fair share of kitchen spills, giggles, and even some creative ingredient swaps—all of them leading to delicious outcomes!
Now, I’ve seen some folks try to get fancy and use fancy glassware or complicated techniques, but I firmly believe that the best recipes come from that place of joy and simplicity. So don’t stress if things get a little messy; it’s all part of the fun!
FAQs and Troubleshooting: Got Questions? I’ve Got Answers!
-
Can I make these cups in advance?
Absolutely! You can prepare these cups a day in advance. Just store them in the refrigerator and garnish just before serving to keep the toppings fresh. -
I don’t have instant pudding. Can I use regular pudding mix?
Sure! Just follow the package instructions and allow the pudding to set before using it in the dirt cups. -
How long will the dirt cups stay fresh?
If stored properly in the fridge, they should last about 3-4 days. Just be sure to keep them sealed to prevent drying out! -
What if I don’t like chocolate?
No problem! Use vanilla pudding instead, and feel free to add flavors like almond extract to the cream cheese mixture for a delightful twist.
Nutritional Info
While I’d love to provide full nutritional info, remember that these delightful Dirt Cups are meant for enjoyment! You can modify the ingredients to suit your dietary preferences, and always enjoy in moderation. After all, cooking and sharing food should be a joyous experience!
And there you have it, friends! Your ultimate guide to making divine Oreo Cookie Dirt Cups! Whether it’s to relive fond childhood memories or to whip up a quick treat for your loved ones, these cups are sure to bring joy and laughter into your kitchen. Happy cooking, and remember to enjoy every delicious bite!
PrintOreo Cookie Dirt Cup
A fun no-bake treat featuring crushed Oreos, creamy filling, and gummy worms, perfect for all ages.
- Prep Time: 20 minutes
- Cook Time: 0 minutes
- Total Time: 60 minutes
- Yield: 4 servings 1x
- Category: Dessert
- Method: No-Bake
- Cuisine: American
- Diet: Vegetarian
Ingredients
- 1 package Oreo Cookies
- 4 tbsp Butter (Softened)
- 1 cup Powdered Sugar
- 8 oz Cream Cheese (Softened)
- 2 packages Instant Chocolate Pudding (3.9 oz each)
- 3.5 cups Milk
- 12 oz Cool Whip
- Gummy Worms (Optional)
Instructions
- Crush the Oreos: Grab your food processor and pulse the Oreo cookies until finely crushed.
- Prepare the Butter Mixture: In a medium bowl, combine the crushed Oreos with the softened butter.
- Create the Cream Cheese Filling: In another large mixing bowl, beat the softened cream cheese using an electric mixer.
- Mix in the Pudding: Add the two packages of instant chocolate pudding to your cream cheese mixture.
- Fold in the Cool Whip: Gently fold the Cool Whip into the pudding and cream cheese mixture.
- Assemble the Dirt Cups: In your favorite cups or glasses, sprinkle a layer of the Oreo-butter mixture.
- Top It Off: Place gummy worms on top, letting them peek out like they’re crawling around in the dirt.
- Chill: Pop these beauties in the fridge for at least 1 hour to let them set.
Notes
These cups can be prepared a day in advance and stored in the refrigerator. Garnish just before serving.
Nutrition
- Serving Size: 1 serving
- Calories: 350
- Sugar: 27g
- Sodium: 350mg
- Fat: 17g
- Saturated Fat: 9g
- Unsaturated Fat: 5g
- Trans Fat: 0g
- Carbohydrates: 46g
- Fiber: 1g
- Protein: 4g
- Cholesterol: 30mg
Keywords: Oreo, dessert, no-bake, dirt cup, kid-friendly