
Mini Candy Corn Cheesecakes: A Halloween Treat to Impress
Fall is in the air, and you know what that means—pumpkin spice, cozy sweaters, and, of course, the thrilling anticipation of Halloween! If you’re like me, Halloween is not just about costumes and trick-or-treating; it’s also a chance to whip up some fun and festive treats that will delight your friends and family. One dessert that never fails to bring out smiles and squeals of excitement is these adorable Mini Candy Corn Cheesecakes!
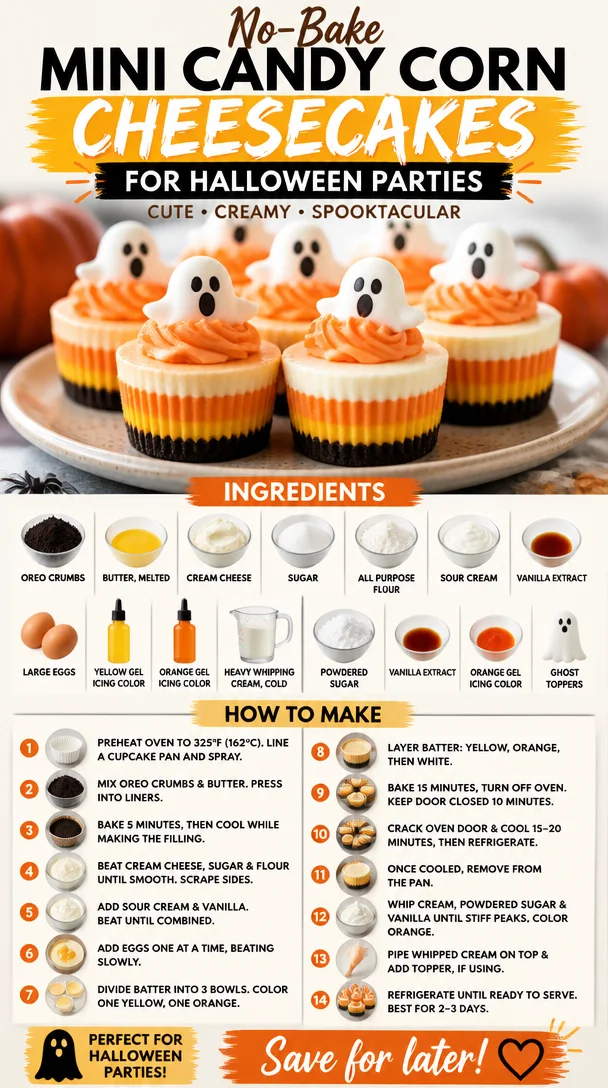
These mini cheesecakes are not only delicious but visually stunning with their bright orange, yellow, and white layers that mimic our favorite Halloween candy—candy corn! They’re perfect for parties, potlucks, or just a fun night in. And let me tell you, there’s something incredibly satisfying about popping one of these mini treats into your mouth and savoring the creamy, sweet goodness. Trust me, once you make these, they will become a Halloween staple in your household.
A Sweet Trip Down Memory Lane
Every great recipe has a story, and this one is no different! When I was a kid, my family would throw the best Halloween parties. From spooky decorations to themed games, there was always something to do. But the highlight was always the dessert table. My mom had this incredible knack for turning ordinary recipes into festive creations. One year, she made mini cheesecakes decorated like pumpkins and ghosts, and they were such a hit!
I remember gathering with my friends, wide-eyed as we indulged in the creamy delights, each bite better than the last. That experience stuck with me, and I’ve always wanted to recreate those magical mini desserts with my own twist—enter these Mini Candy Corn Cheesecakes! Inspired by that cherished memory, I’ve crafted a recipe that’s easy to follow, bursting with flavor, and brings the same joy I felt as a child.
Ingredients You’ll Need
To capture the essence of candy corn in these little cheesecakes, gather the following ingredients:
-
1 1/2 cups (201g) Oreo crumbs
These serve as a deliciously chocolatey crust. You can substitute with Graham cracker crumbs, but the chocolate flavor really adds a nice contrast! -
2 tbsp (41g) butter, melted
This helps bind the crumbs together. Any unsalted butter works perfectly. -
12 ounces (339g) cream cheese, room temperature
The star of the show! Make sure it’s softened for easy mixing. Neufchâtel cheese is a lighter alternative if you prefer. -
1/2 cup (104g) sugar
Regular granulated sugar works best, but feel free to swap for coconut sugar for a more caramel-like sweetness. -
2 tbsp (16g) all-purpose flour
This helps stabilize our cheesecake. If you’re gluten-free, a gluten-free flour blend can be used here. -
1/2 cup (115g) sour cream
Adds richness and tanginess. You can substitute with Greek yogurt for a healthier option. -
1 1/2 tsp vanilla extract
Go for pure vanilla extract if possible; the flavor enhancement is worth it! -
2 large eggs
They help to set the cheesecake. If you’re looking to make it egg-free, you can experiment with flax eggs as a substitute. -
Yellow gel icing color
This gives us that sunny candy corn hue. -
Orange gel icing color
For that vibrant orange layer—gel colors work better than liquid for brighter shades! -
1/2 cup (120ml) heavy whipping cream, cold
Essential for making that fluffy whipped topping. You can use coconut cream for a dairy-free version. -
5 tbsp (36g) powdered sugar
This sweetens the whipped cream. If you’re aiming for less sugar, feel free to reduce the amount. -
1/2 tsp vanilla extract
Another splash of vanilla makes everything better! -
Ghost toppers
Find these little guys at craft stores or online to add a spooky flair!
Step-by-Step Instructions
Ready to bring this sweet vision to life? Let’s roll up our sleeves and get cooking!
-
Preheat Your Oven
Start by preheating your oven to 325°F (160°C). We want it nice and warm for those cheesecakes! -
Mix the Crust
In a mixing bowl, combine the Oreo crumbs and melted butter until thoroughly mixed. This mixture should resemble wet sand; if it holds together when pressed, you’re good to go! -
Prepare the Pan
Line a 12-cup muffin tin with cupcake liners or grease it if you’re feeling rebellious. Press about 1 tablespoon of the crumb mixture into the bottom of each muffin cup, making sure to compact it down well using the bottom of a glass or your hands. This will create a sturdy base for your cheesecake. -
Bake the Crust
Pop the pan in the oven and bake for about 5-7 minutes. This will help the crust firm up. Let it cool slightly while you work on the filling! -
Mix the Cheesecake Filling
In a large mixing bowl, combine the softened cream cheese and sugar. Beat with a hand mixer or stand mixer on medium speed until smooth and creamy. This is where you want to incorporate some air for a light texture. -
Add the Egg and Sour Cream
Add the sour cream and vanilla extract, mixing until combined. Now, beat in the eggs, one at a time, being careful not to overmix. We want everything just combined to keep our cheesecakes nice and fluffy! -
Divide the Batter
Once smooth, divide the cheesecake mixture evenly into two bowls. In one bowl, mix in a few drops of yellow gel icing color until you reach your desired shade. In the second bowl, add a few drops of orange gel icing color. -
Layer the Cheesecake
Carefully spoon or pipe the yellow cheesecake filling over the baked crust, filling each cup about halfway. Repeat with the orange layer, filling each cup almost to the top. You can use a piping bag for neater layers. The swirled effect looks super cute as well; just give it a little mix with a toothpick! -
Bake the Cheesecakes
Bake them for 15-20 minutes until the centers are set but still have a slight jiggle. Remember, they will firm up more as they cool, so don’t overbake! -
Cool it Down
Remove the pan from the oven and let the mini cheesecakes cool at room temperature for about 30 minutes. Then transfer them to the fridge to chill for at least 3 hours (or overnight, if you can wait!). -
Whip up the Cream Topping
Once the cheesecakes are set, it’s time for the creamy topping! In a medium bowl, beat the cold heavy cream and powdered sugar until stiff peaks form. Add in the final splash of vanilla extract for that signature flavor. -
Pipe the Whipped Cream
Use a piping bag fitted with a star tip to swirl the whipped cream on top of each cheesecake. Top with your cute ghost toppers and you’re all set!
Serving Suggestions
To serve these delightful Mini Candy Corn Cheesecakes, gently peel the cupcake liners away from the sides and carefully transfer them to a serving platter. The colorful layers are just begging to be shown off! You can even drizzle some chocolate sauce or caramel over the top for an extra touch of decadence. Pair them with a spooky-themed drink or your favorite fall treat for the perfect Halloween spread!
Recipe Variations
Feeling adventurous? Here are some creative twists for your Mini Candy Corn Cheesecakes:
- Pumpkin Spice Twist: Add a teaspoon of pumpkin spice to the cheesecake mixture for a seasonal flavor boost!
- Chocolate Layer: Substitute one of the cheesecake layers with a rich chocolate cheesecake. Just blend in some melted chocolate for an elegant touch.
- Nutty Crust: Swap out the Oreo crust for a nut-based crust using ground almonds or pecans mixed with dates. A healthier alternative that’s still sweet and satisfying!
- Fruit Topping: Top with a small spoonful of pumpkin puree instead of whipped cream for a fruity fall-inspired twist.
- Dairy-Free Delight: Use non-dairy cream cheese and coconut cream to make this treat suitable for vegans!
Chef’s Notes
I have to tell you, this recipe has come a long way! The first time I tried to make a layered cheesecake, let’s just say it ended in a flavorful disaster. I remember using way too many layers, and they all cracked instead of being a smooth, tantalizing treat. But after lots of trial and error, I’ve found that less is more when it comes to layers. These mini versions not only look good, but they’re also bite-sized perfection! Plus, the technique for layering just the right amount of colors has become a party trick I love to show off.
And how about that whipped cream? I’ve experimented with all sorts of toppings, but we always return to the classic whipped cream—there’s nothing better than that fluffy texture against the creamy cheesecake!
FAQs and Troubleshooting
1. Why did my cheesecakes crack?
Cracking often occurs due to baking at too high a temperature or overmixing the batter. Always keep an eye on them as they bake—stop when they’re just set, and let them cool gently to avoid cracks.
2. Can I make these ahead of time?
Absolutely! In fact, these cheesecakes get better as they sit. Make them a day ahead of time and store them in the fridge until ready to serve.
3. Can I use a different type of crust?
Of course! A graham cracker crust, shortbread, or even a gluten-free crust works beautifully. Just make sure it’s well-compressed to hold the cheesecake filling.
4. My cream didn’t whip up. What happened?
Ensure your heavy whipping cream is really cold and that your bowl and beaters are clean. Any leftover grease can prevent whipping. Also, don’t skimp on the whisking; patience is key here!
Nutritional Info
These Mini Candy Corn Cheesecakes are a treat to be enjoyed in moderation! They contain a balance of carbohydrates, fats, and proteins to satisfy your sweet tooth on special occasions.
There you have it! A delightful, captivating recipe for Mini Candy Corn Cheesecakes that will surely impress your guests and create unforgettable moments. Cooking should be fun, so embrace the mess, enjoy the process, and let’s whip up something great together! Happy baking!
PrintMini Candy Corn Cheesecakes
Adorable and delicious mini cheesecakes inspired by candy corn, perfect for Halloween parties.
- Prep Time: 20 minutes
- Cook Time: 30 minutes
- Total Time: 180 minutes
- Yield: 12 servings 1x
- Category: Dessert
- Method: Baking
- Cuisine: American
- Diet: Vegetarian
Ingredients
- 1 1/2 cups (201g) Oreo crumbs
- 2 tbsp (41g) butter, melted
- 12 ounces (339g) cream cheese, room temperature
- 1/2 cup (104g) sugar
- 2 tbsp (16g) all-purpose flour
- 1/2 cup (115g) sour cream
- 1 1/2 tsp vanilla extract
- 2 large eggs
- Yellow gel icing color
- Orange gel icing color
- 1/2 cup (120ml) heavy whipping cream, cold
- 5 tbsp (36g) powdered sugar
- 1/2 tsp vanilla extract
- Ghost toppers
Instructions
- Preheat your oven to 325°F (160°C).
- Mix the Oreo crumbs and melted butter until thoroughly combined.
- Prepare a 12-cup muffin tin with cupcake liners or grease it.
- Press about 1 tablespoon of the crumb mixture into the bottom of each muffin cup.
- Bake for 5-7 minutes and let cool slightly.
- Combine cream cheese and sugar in a large mixing bowl and beat until smooth.
- Add the sour cream and vanilla extract, mixing until combined, then beat in the eggs one at a time.
- Divide the cheesecake mixture into two bowls, adding yellow gel icing to one and orange gel icing to the other.
- Spoon the yellow cheesecake filling over the crust, then repeat with the orange layer.
- Bake for 15-20 minutes until the centers are set.
- Cool at room temperature for about 30 minutes, then refrigerate for at least 3 hours.
- Whip the heavy cream and powdered sugar until stiff peaks form.
- Pipe the whipped cream on top of each cheesecake and decorate with ghost toppers.
Notes
Make these ahead of time for the best flavor. Each layer adds a festive touch that will impress your guests!
Nutrition
- Serving Size: 1 cheesecake
- Calories: 220
- Sugar: 15g
- Sodium: 180mg
- Fat: 11g
- Saturated Fat: 6g
- Unsaturated Fat: 4g
- Trans Fat: 0g
- Carbohydrates: 27g
- Fiber: 1g
- Protein: 3g
- Cholesterol: 60mg
Keywords: candy corn, Halloween treats, mini cheesecakes, festive desserts