

No-Bake Mini Cheesecake Cups: A Sweet Escape
When it comes to desserts, there’s something undeniably special about cheesecake. It’s creamy, luscious, and just the right amount of indulgent. And let’s be honest — who doesn’t love a no-bake option? No stress about timing the oven or fighting with a springform pan; it’s just pure, simple joy from bowl to belle. Today, I’m bringing you my No-Bake Mini Cheesecake Cups — the perfect sweet treat for any occasion, whether it’s a casual weeknight, a chic dinner party, or a special occasion with friends.
Imagine this: you’ve had a long week, and finally, the weekend rolls around. You’re ready to chill, sip on your favorite drink, and dig into something truly delicious. That’s where these mini cheesecakes come in. They’re not just tasty; they’re a breeze to make! Plus, the individual cups add a fun, modern touch to your dessert game. So, grab your favorite playlist, and let’s dive into the creamy goodness!
These mini cheesecake cups are all about making you feel like a superstar in your own kitchen. With a few simple ingredients and a little bit of love, you’ll have a dessert that looks impressive but feels totally approachable. Trust me — once you make these, they might just become your go-to way to satisfy that sweet tooth.
A Sweet Memory
Growing up, my family had a tradition of summer barbecues where dessert was the grand finale of every meal. My grandmother, bless her heart, had a special way of preparing her famous cheesecake that was not only mouth-watering but was also a family affair. We’d gather around the kitchen — me, my siblings, and my cousins — watching her whip the cream cheese until it was nice and fluffy. Everyone had a role: one person would crush the graham crackers, another would mix the filling, and the youngest would be in charge of sneaking spoonfuls of the delicious batter.
Those moments were filled with laughter, sticky fingers, and the taste of childhood happiness. Sometimes, my grandmother would let us top her classic cheesecake with fresh strawberries or chocolate sauce, letting our creativity shine. It wasn’t just about the dessert; it was the memories we created while making it. Fast forward to today, and while I adore a good classic cheesecake, I’ve found a love for these no-bake mini cheesecake cups that evoke that same joyful spirit but fit into our fast-paced lives without compromising on flavor or fun.
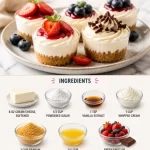
Ingredients
Here’s what you’ll need to whip up these delightful no-bake cheesecakes:
-
8 oz cream cheese, softened
This is the superstar of your cheesecake! Make sure it’s softened to room temperature for easy mixing. If you’re dairy-free, you can substitute with a cashew-based cream cheese or even silken tofu blended until smooth. -
1/2 cup powdered sugar
This sweet touch balances the richness of the cream cheese perfectly. If you prefer less sweetness, feel free to adjust to taste, or use coconut sugar for a less refined option. -
1 tsp vanilla extract
A splash of vanilla adds a warm, inviting flavor to your filling. If you’re feeling adventurous, try substituting with almond extract or even citrus zest for a zesty twist. -
1 cup whipped cream
Light and airy, this adds fluffiness to your cheesecake. You can use store-bought whipped cream, or make your own. Use heavy cream for best results; if you want a non-dairy option, look for coconut whipped cream. -
1 cup graham cracker crumbs
The classic crust flavor! If you’re gluten-free, reach for gluten-free graham crackers or even crushed almonds for a nutty twist. -
1/4 cup butter, melted
This helps bind the crumb mixture for the crust and gives it a rich flavor. Coconut oil also works beautifully in this recipe if you want to keep it dairy-free. -
Fresh fruit or chocolate for topping (optional)
Get creative with your toppings! Berries, caramel drizzle, or even shredded chocolate can add an extra flair to your mini cheesecakes.
Step-by-Step Instructions
Ready to dive into the world of creamy goodness? Let’s get to it!
-
Prepare the Crust
In a bowl, combine the 1 cup of graham cracker crumbs and 1/4 cup of melted butter. Mix well until all the crumbs are fully coated. Here’s a pro tip: if you love a little extra flavor, toss in a tablespoon of sugar or a pinch of cinnamon to elevate your crust. -
Set Up Your Cups
Get your serving cups ready! Whether you’re using small glass jars or cupcake liners, make sure they’re easily accessible on your countertop. Spoon about a tablespoon of the crumb mixture into the bottom of each cup. Press gently with the back of a spoon to create an even base. Don’t rush this step; a solid crust makes all the difference! -
Make the Cheesecake Filling
In a separate bowl, beat the softened cream cheese until smooth. Add in the powdered sugar and vanilla extract. Beat again until well combined. This is where the magic starts to happen! You want a silky-smooth, spreadable mixture, so take your time and scrape the sides of the bowl as needed. -
Fold in the Whipped Cream
Gently fold the whipped cream into the cream cheese mixture. Here’s a chef hack: use a spatula and lift from the bottom of the bowl to keep that airy texture you’re after. You want to maintain that lovely fluffiness, so be gentle! It should be light and creamy without being deflated. -
Assemble the Mini Cheesecakes
Use a piping bag, spoon, or just go in with your hands (no judgment here!) to layer the cheesecake filling over the crumb crust. Fill each cup to just about the top, leaving a little space for your toppings. If you want to make a layered effect, alternate between cream cheese and crust, ending with filling on top. -
Chill and Set
Cover the cups with plastic wrap or a lid and pop them in the fridge for at least 2 hours, but if you can wait overnight, even better! This will allow the flavors to meld and set up beautifully. -
Top and Serve
Once chilled, it’s time for the fun part: topping! Add fresh fruit, a drizzle of chocolate, or whatever you fancy. You can even crumble some extra graham crackers on top for added crunch. Now you’re ready to dig in!
Serving Suggestions
For a delightful presentation, consider serving your mini cheesecake cups on a large platter decorated with fresh berries or mint leaves. Drizzle a bit of chocolate sauce around the cups or lay a few whole graham crackers artfully beside them for that extra touch of elegance. These are perfect for sharing at a potluck or for setting on a table when friends come over — they look so inviting!
Recipe Variations
Feeling creative? Here are a few fun twists you can make:
-
Chocolate Cheesecake Cups: Add melted chocolate to the cream cheese mixture for a decadent chocolate flavor. Top with chocolate shavings or mini chocolate chips for the ultimate indulgence.
-
Fruit-Infused Cheesecake: Mix in your favorite fruit puree (like strawberry or mango) into the cream cheese filling before folding in the whipped cream. Top with fresh slices of the same fruit for a beautiful finish.
-
Caramel Swirl: Add a swirl of caramel sauce into the cream cheese filling for a sweet and salty twist. Drizzle caramel on top as well — irresistible!
-
Nutty Bites: Incorporate finely chopped nuts into your crust for added texture and a nutty flavor. Almonds or pecans work great!
-
Cheesecake Shooters: Use shot glasses and layer in more ingredients — the cheesecake filling, crumbled crust, and layers of fruit or chocolate for a fun, shareable treat.
Chef’s Notes
This recipe evolved over time from the classic cheesecake my grandmother used to make. Over the years, I wanted to find a balance between delicious flavor and quick preparation, perfect for our busy lives. The no-bake twist allows everyone to indulge in cheesecake without the need for precision timing or baking. I love experimenting with the toppings; often, what’s leftover in the fridge becomes the star of the show. Don’t hesitate to let your creativity shine through in the kitchen!
FAQs and Troubleshooting
1. Can I use low-fat cream cheese?
Absolutely! Low-fat cream cheese can work, but may slightly alter the texture. Just be aware that it may not be as creamy.
2. My crust is too crumbly; what did I do wrong?
You might not have added enough melted butter! Ensure the crumbs are well-coated so they can hold together when pressed.
3. How do I store leftovers?
Store any leftovers covered in the fridge for up to 3 days. If you’ve added fruit or chocolate on top, consider adding toppings fresh each time you serve.
4. Can I freeze these mini cheesecakes?
Yes! These mini cheesecake cups freeze well. Just make sure to wrap them airtight. Thaw in the fridge before serving.
Nutritional Info
While exact nutritional information can vary based on specific brands and quantities used, here’s a rough estimate for each mini cheesecake cup (based on serving 8 cups):
- Calories: ~ 270
- Carbohydrates: ~ 30g
- Protein: ~ 3g
- Fat: ~ 16g
- Sugar: ~ 12g
Now, get your kitchen gear prepped, and let’s have some fun with these No-Bake Mini Cheesecake Cups! They’re a guaranteed hit, and the best part? You made them yourself. Enjoy every luscious bite and the smiles these treats bring to family and friends. Happy cooking!
PrintNo-Bake Mini Cheesecake Cups
Delightful no-bake mini cheesecake cups, perfect for any occasion. Creamy, easy to make, and topped with your favorite flavors.
- Prep Time: 20 minutes
- Cook Time: 0 minutes
- Total Time: 120 minutes
- Yield: 8 servings 1x
- Category: Dessert
- Method: No-Bake
- Cuisine: American
- Diet: Vegetarian
Ingredients
- 8 oz cream cheese, softened
- 1/2 cup powdered sugar
- 1 tsp vanilla extract
- 1 cup whipped cream
- 1 cup graham cracker crumbs
- 1/4 cup butter, melted
- Fresh fruit or chocolate for topping (optional)
Instructions
- Prepare the crust: In a bowl, combine the graham cracker crumbs and melted butter. Mix well until all the crumbs are fully coated.
- Set up your cups: Get your serving cups ready and spoon about a tablespoon of the crumb mixture into each cup, pressing gently to create a base.
- Make the cheesecake filling: Beat the softened cream cheese until smooth, then add in the powdered sugar and vanilla extract; beat until well combined.
- Fold in the whipped cream gently using a spatula to maintain the airy texture.
- Assemble the mini cheesecakes by layering the cheesecake filling over the crust in each cup.
- Chill the cups in the fridge for at least 2 hours.
- Top and serve with fresh fruit, chocolate, or other toppings of your choice.
Notes
Feel free to experiment with different flavors by adding fruit purees or chocolate to the filling.
Nutrition
- Serving Size: 1 cup
- Calories: 270
- Sugar: 12g
- Sodium: 200mg
- Fat: 16g
- Saturated Fat: 10g
- Unsaturated Fat: 6g
- Trans Fat: 0g
- Carbohydrates: 30g
- Fiber: 1g
- Protein: 3g
- Cholesterol: 40mg
Keywords: cheesecake, no-bake dessert, mini desserts, easy recipes