
Strawberry Earthquake Cake: A Deliciously Unique Dessert
Hello there, fellow food lovers! Today, we’re diving into a delightful dessert that’s not just a feast for the eyes but also a treat for the taste buds—the Strawberry Earthquake Cake! If you’re looking to make a showstopper of a dessert without spending all day in the kitchen, you’ve landed on the right recipe. This playful cake offers a fantastic blend of rich chocolate flavor, creamy cheesecake goodness, and fresh strawberry bursts that will have everyone asking for seconds. Let’s get started!
A Slice of Nostalgia
As a kid, there was nothing more thrilling than when my family decided to host a potluck. You know the ones—everyone gathers, each bringing their best dish, and dessert is the grand finale. I remember one year, my Aunt Lucy unveiled her famous “Earthquake Cake.” Now, this dessert was the star of the show, with its chocolate layers cracking open to reveal creamy cheese and sweet strawberries. It was a crowd pleaser that made my little heart leap with joy!
I remember sneaking bites of the cake while it was cooling on the counter, its chocolaty aroma curling around me like a warm hug. Whenever Aunt Lucy made it, conversations flew, laughter filled the air, and everyone congregated around the kitchen island—our unofficial throne of deliciousness. Fast forward to now, I’ve transformed Aunt Lucy’s classic into my own version, adding fresh strawberries for that fruity pop. Trust me, every bite forges new memories, and I can’t wait for you to create your own with this mouthwatering recipe!
Ingredients
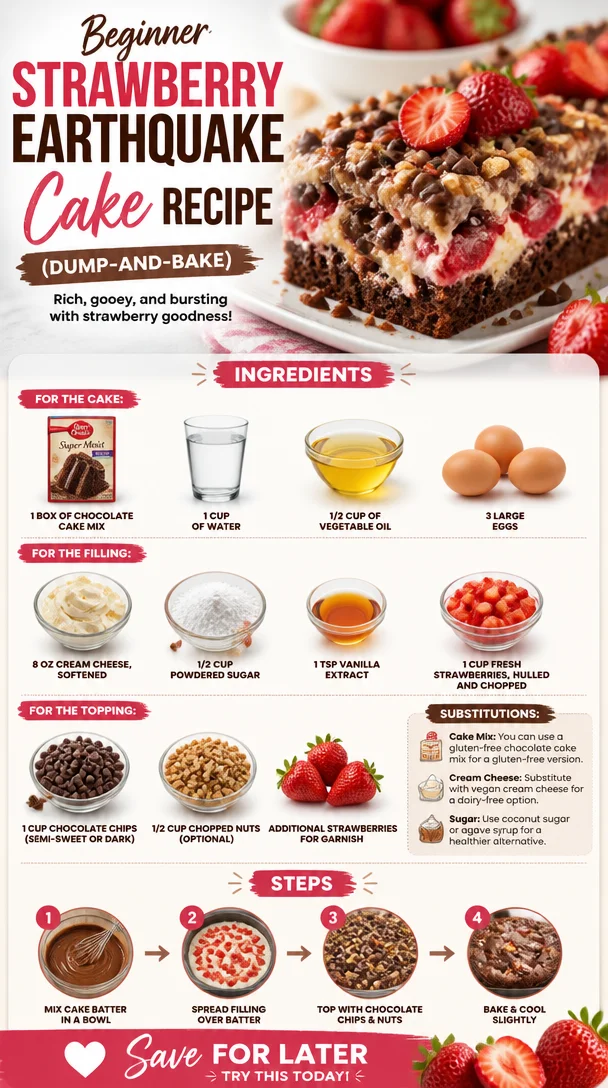
Let’s gather our ingredients! Here’s what you’ll need to whip up this luscious Strawberry Earthquake Cake:
For the Cake:
-
1 box of chocolate cake mix (or homemade chocolate cake)
Not all chocolate cake mixes are created equal, so look for one that promises rich flavor and moist texture. You can definitely go homemade if that’s your jam! -
1 cup of water
This adds the necessary moisture to our cake. You can also use coffee for a deeper chocolate flavor. -
1/2 cup of vegetable oil
Oil makes the cake moist and fluffy. If you prefer, melted coconut oil works fantastically as well. -
3 large eggs
Eggs help bind the cake and contribute to that delightful rise!
For the Filling:
-
8 oz cream cheese, softened
A key player in our dessert! Cream cheese adds a lovely tang and creamy texture. If you need a dairy-free option, grab some vegan cream cheese instead. -
1/2 cup powdered sugar
This sweetener balances the tartness of the cream cheese without being overly sweet. For a healthier alternative, try coconut sugar or agave syrup. -
1 tsp vanilla extract
A splash of vanilla enhances the filling’s flavor beautifully. -
1 cup fresh strawberries, hulled and chopped
The spotlight ingredient! Fresh strawberries add juiciness and color. If strawberries aren’t in season, consider raspberries or cherries!
For the Topping:
-
1 cup chocolate chips (semi-sweet or dark)
These melt beautifully on top for that indulgent finish. Feel free to use milk or white chocolate chips, depending on your sweet tooth. -
1/2 cup chopped nuts (optional)
Walnuts or pecans add a delightful crunch! Omit if you prefer a nut-free dessert. -
Additional strawberries for garnish
Because let’s be real, they make everything look fancy!
Step-by-Step Instructions
Now, let’s get cooking!
-
Preheat Your Oven
Preheat your oven to 350°F (175°C). This ensures a beautifully baked cake. While it preheats, you can grease a 9×13-inch baking pan with cooking spray or butter. -
Prepare the Cake Batter
In a large mixing bowl, combine the chocolate cake mix, water, vegetable oil, and eggs. Use an electric mixer on low speed until the batter comes together, then increase to medium speed for about 2 minutes. Look at that rich, chocolatey goodness! -
Pour the Batter
Pour the cake batter into the prepared baking pan, smoothing it out evenly with a spatula. No need for perfection here—just spread it out as best as you can! -
Make the Cream Cheese Filling
In a separate bowl, combine the softened cream cheese, powdered sugar, and vanilla extract. Mix until smooth and creamy. I love using a hand mixer for this step—it saves time and ensures no lumps! -
Add Strawberries
Gently fold in the chopped strawberries into the cream cheese mixture. This step is where the magic happens—the strawberries add a fresh burst that contrasts perfectly with the chocolate. -
Create Your Earthquake
Spoon dollops of the cream cheese filling over the chocolate cake batter. Don’t worry if it doesn’t cover the surface perfectly! As it bakes, it will create delicious “earthquake” cracks. -
Sprinkle the Toppings
Add chocolate chips (and nuts if using) on top of the cream cheese filling. This makes for a delightful melty topping once baked. -
Bake the Cake
Pop the cake into the preheated oven and bake for about 35-40 minutes. You’ll know it’s ready when a toothpick inserted into the center comes out clean (or with just a few moist crumbs). -
Let It Cool
Once baked, remove the cake from the oven and let it cool for at least 15-20 minutes. Trust me, this resting period makes it easier to slice.
Serving Suggestions
When it comes to serving this divine dessert, keep it simple. Slice it into generous squares and place them on dessert plates. For a little flair, top each piece with a few additional fresh strawberries and perhaps a drizzle of chocolate sauce. Don’t forget a dollop of whipped cream or a scoop of vanilla ice cream if you’re feeling indulgent!
Recipe Variations
This Strawberry Earthquake Cake is versatile, and you can easily switch things up. Here are some fun variations:
-
Berry Delight: Substitute fresh strawberries with blueberries, raspberries, or a mixed berry blend for a flavor explosion.
-
Nutty Buddy: Add chopped nuts directly into the batter for extra crunch and flavor.
-
Minty Fresh: Toss in a few chopped mint leaves with the strawberries for a refreshing twist.
-
Coffee Kick: Replace the water with brewed coffee in the cake batter for an extra depth of flavor.
Chef’s Notes
I can’t help but smile when I think about how this process has evolved over the years. I initially struggled to find the perfect cream cheese texture, often ending up with a filling that was too thick or not sweet enough. After plenty of kitchen experimentation, I finally found the right balance—thankfully, my trusty taste testers were always willing to help! The thrill of seeing someone take their first bite and witnessing their eyes light up is all the motivation I need.
With every new twist I try, I’m constantly reminded that cooking is about joy, exploration, and a dash of love. I hope you feel inspired to create and share this cake with your loved ones!
FAQs and Troubleshooting
Q1: Why did my cake sink in the middle?
Sometimes, if you open the oven door too early, the sudden drop in temperature can cause the cake to sink. Keep that oven door closed until the minimum baking time is up!
Q2: Can I make this ahead of time?
Absolutely! This cake stores well in the fridge for about 3-4 days. Just be sure to cover it tightly with plastic wrap or store it in an airtight container.
Q3: How do I prevent the cream cheese filling from sinking?
Ensure your cream cheese is softened at room temperature for easier mixing, which helps create a lighter filling. You might also want to add a bit more powdered sugar for stability.
Nutritional Info
While it’s always a treat to indulge in dessert, here’s a rough idea of the nutritional content per serving (based on 12 servings):
- Calories: 350
- Fat: 15g
- Carbohydrates: 50g
- Protein: 5g
- Fiber: 1g
(Nutritional values may vary based on specific ingredients used)
Now, my dear foodies, it’s time to unleash your inner baker and create this delightful Strawberry Earthquake Cake! Grab your favorite pan, turn up your favorite playlist, and let’s make something truly great together. Happy baking!
PrintStrawberry Earthquake Cake
A delightful dessert blending rich chocolate flavor, creamy cheesecake, and fresh strawberries for a showstopping treat.
- Prep Time: 15 minutes
- Cook Time: 40 minutes
- Total Time: 55 minutes
- Yield: 12 servings 1x
- Category: Dessert
- Method: Baking
- Cuisine: American
- Diet: Vegetarian
Ingredients
- 1 box chocolate cake mix
- 1 cup water
- 1/2 cup vegetable oil
- 3 large eggs
- 8 oz cream cheese, softened
- 1/2 cup powdered sugar
- 1 tsp vanilla extract
- 1 cup fresh strawberries, hulled and chopped
- 1 cup chocolate chips (semi-sweet or dark)
- 1/2 cup chopped nuts (optional)
- Additional strawberries for garnish
Instructions
- Preheat your oven to 350°F (175°C).
- Grease a 9×13-inch baking pan with cooking spray or butter.
- Combine in a large mixing bowl the chocolate cake mix, water, vegetable oil, and eggs.
- Mix on low speed until the batter comes together, then increase to medium speed for about 2 minutes.
- Pour the cake batter into the prepared baking pan.
- In a separate bowl, combine the softened cream cheese, powdered sugar, and vanilla extract.
- Mix until smooth and creamy.
- Fold in the chopped strawberries into the cream cheese mixture.
- Spoon dollops of the cream cheese filling over the chocolate cake batter.
- Add chocolate chips (and nuts if using) on top.
- Bake for about 35-40 minutes.
- Cool for at least 15-20 minutes before slicing.
Notes
Top each slice with fresh strawberries and optional drizzles of chocolate sauce or whipped cream.
Nutrition
- Serving Size: 1 slice
- Calories: 350
- Sugar: 20g
- Sodium: 300mg
- Fat: 15g
- Saturated Fat: 7g
- Unsaturated Fat: 6g
- Trans Fat: 0g
- Carbohydrates: 50g
- Fiber: 1g
- Protein: 5g
- Cholesterol: 40mg
Keywords: cake, dessert, strawberry, chocolate cake, earthquake cake, baked dessert