

The Dreamy Cookie Butter Ice Cream That’ll Leave You Wanting More
Welcome to my kitchen! Today, we’re diving into a delightful treat that’s perfect for any occasion — Cookie Butter Ice Cream. Yes, you heard that right. This isn’t just any ice cream; it’s a creamy, dreamy dessert that takes your taste buds on a rollercoaster of flavors, blending the nostalgia of childhood sweets with that cozy feeling of home. If you’ve ever spread cookie butter on toast, well, just imagine that, but frozen and made even more delightful with the addition of crumbled Biscoff cookies. Sounds amazing, right? Well, grab a spoon and let’s get started!
Not only is this Cookie Butter Ice Cream ridiculously easy to whip up, but it also allows for some serious kitchen experimentation. Did I mention you can customize it to suit your cravings? By the end of this post, you’ll feel empowered and excited to make your batch of ice cream. So whether you’re celebrating the end of a long week, hosting a dinner party, or just indulging in some self-care (you go, chef!), this ice cream is the perfect sweet ending.
A Spoonful of Memories
Every great recipe starts with a story, and this one is no different. My love for cookie butter began years ago during a spontaneous trip to a local grocery store. It was a rainy afternoon, and I stood in the aisle with my cart, not knowing what I was really looking for. Then, out of the corner of my eye, I spotted a small jar of cookie butter. Curious, I tossed it into my cart, thinking it would be just a fun treat.
When I got home, I slathered that cookie butter on everything — toast, pancakes, even straight from the jar. It immediately took me back to my childhood when I’d dunk cookies into chocolate milk, relishing that sweet, indulgent experience. But cookie butter? Oh, it took things to a whole new level! The idea of turning this dreamy concoction into ice cream came to me during one of my late-night snacking sessions. I vividly remember the first time I made it, swirling the cookie butter into the ice cream base and watching it combine with the creaminess of the whole milk and heavy cream. That very first spoonful was an explosion of flavor, and I knew I had created something special.
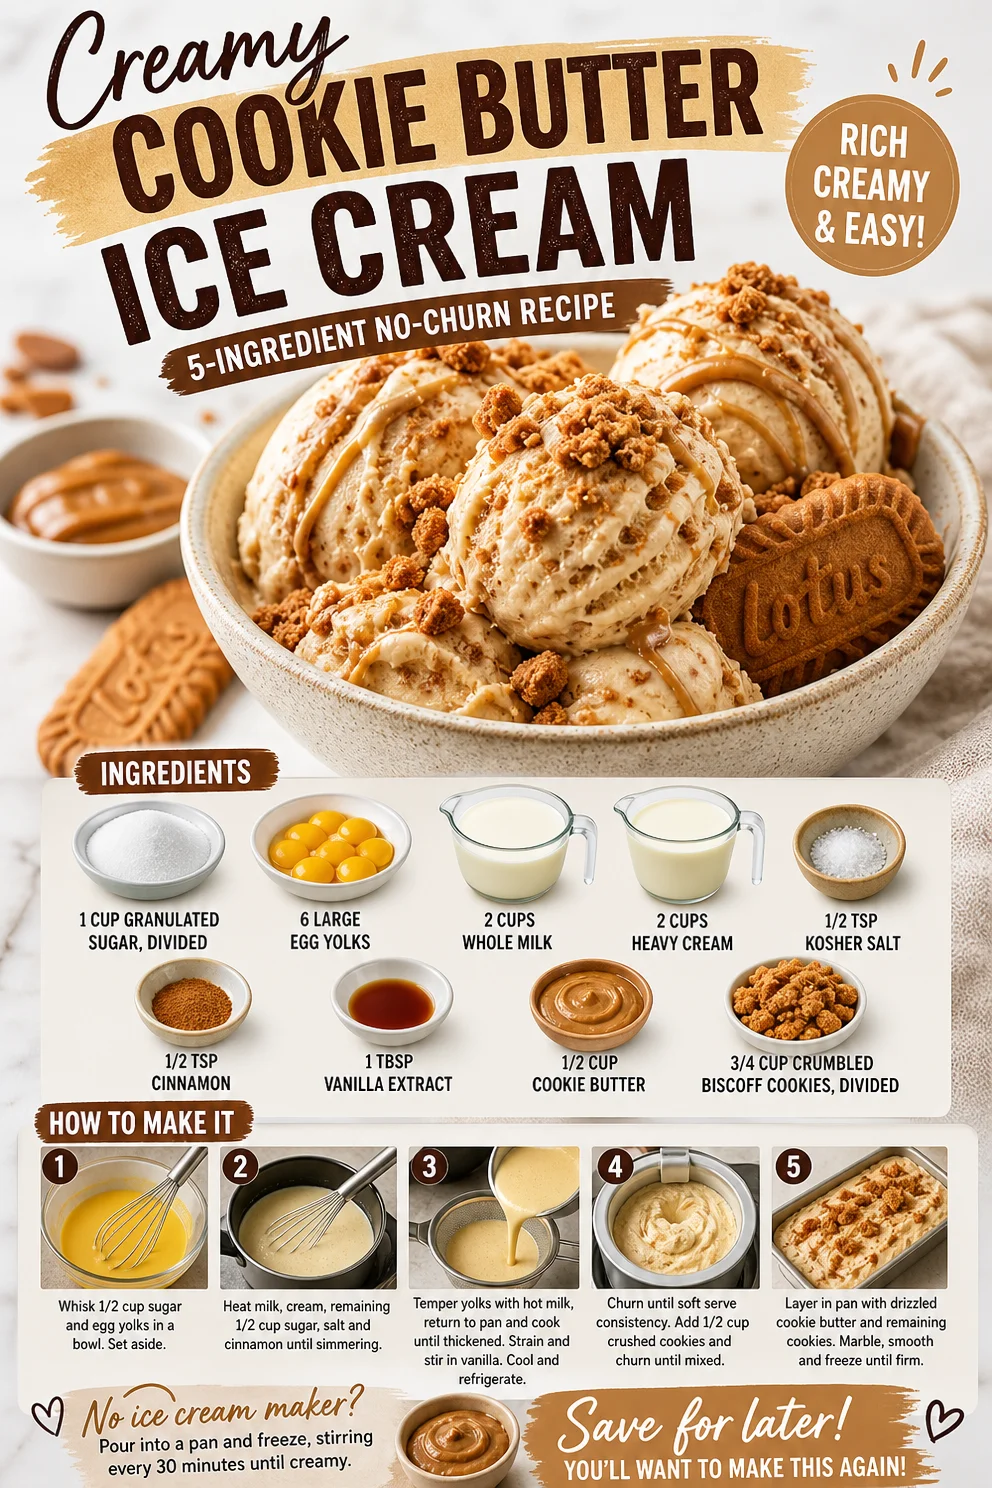
Ingredients You’ll Need
Let’s make sure you’re fully equipped to create this amazing cookie butter ice cream. Here’s what you’ll need:
-
1 cup granulated sugar, divided: This sweetness is essential for the base of our ice cream. You can substitute with a sugar alternative like coconut sugar for a more caramel flavor.
-
6 large egg yolks: The yolks add richness and help create a creamy texture. You could use an egg alternative, like a custard powder, but I highly recommend sticking with the yolks for that authentic ice cream feel.
-
2 cups whole milk: Whole milk provides the ideal creaminess. If you want a lighter option, you could use 2% milk; just remember that the texture won’t be as rich.
-
2 cups heavy cream: This is what makes it indulgent! Whipping cream can be a lighter substitute, but trust me, nothing compares to heavy cream in ice cream.
-
1/2 tsp kosher salt: A bit of salt enhances the sweet flavors and balances everything out.
-
1/2 tsp cinnamon: This adds a warm, comforting hint of spice and works beautifully with cookie butter.
-
1 tbsp vanilla extract: Vanilla is an essential ingredient that elevates all the flavors; feel free to use pure vanilla for the best results.
-
1/2 cup cookie butter: The star of the show! Any brand works, but the creamy texture and flavors are what you’re after.
-
3/4 cup crumbled Biscoff cookies, divided: These crunchy gems add both flavor and texture. Swap with any speculoos or similar spiced cookies if needed!
Step-by-Step Instructions
Alright, let’s get down to business! Follow these detailed steps, and in no time, you’ll have your very own batch of Cookie Butter Ice Cream.
-
Prepare Your Ice Cream Base
In a medium saucepan, combine 1 cup of granulated sugar and 2 cups of whole milk. Whisk them together over medium heat until the sugar dissolves completely. This creates the foundational flavor and sweetness of your ice cream. Keep an eye on it and stir occasionally to prevent it from scalding. -
Mix the Egg Yolks
While the milk is heating, grab a medium bowl and whisk together the 6 large egg yolks. This can be a fun moment to channel your inner chef! Make sure they’re whipped well until they’re pale and slightly thickened. -
Temper the Egg Yolks
Once your milk mixture is hot but not boiling (you should see some steam rising), slowly pour about a cup of the hot milk into the bowl with the egg yolks while whisking constantly. This step, called tempering, helps prevent your yolks from scrambling. After that, slowly pour the egg mixture back into the saucepan, continuing to whisk. -
Thicken the Mixture
Continue cooking over medium-low heat, stirring constantly with a spatula. You want to thicken the mixture until it coats the back of the spatula — about 10 minutes. You’ll know you’re there when you dip the spatula in the mixture, and a line holds! Just don’t rush this process; patience will yield a smoother ice cream. -
Strain and Chill
Once thickened, remove your saucepan from the heat and strain the mixture through a fine-mesh sieve into a large bowl. This will catch any bits of cooked egg. Stir in the heavy cream, kosher salt, cinnamon, and vanilla extract until combined. -
Add the Cookie Butter
Now, here comes the exciting part! Whisk in the 1/2 cup of cookie butter. Let it melt and blend into the creamy mixture fully. The aroma will be absolutely heavenly! -
Cool Down
Cover the bowl with plastic wrap, pressing it gently against the surface of the mixture to prevent a skin from forming. Chill in the fridge for at least 4 hours or overnight if you can bear the anticipation. -
Churn the Ice Cream
Once chilled, pour the mixture into your ice cream maker. Follow the manufacturer’s instructions for churning — typically around 20 to 25 minutes. It should resemble soft-serve ice cream by the end of churning. -
Fold in the Biscoff Crumbles
Gently fold in 1/2 cup of the crumbled Biscoff cookies. This adds a delightful crunch and texture to your ice cream. -
Freeze for Firmness
Transfer the ice cream to an airtight container and fold in the remaining Biscoff crumbs on top. Freeze for at least 4 hours before serving to allow it to firm up nicely.
Serving Suggestions
When you’re ready to serve this dreamy cookie butter ice cream, scoop it into bowls or cones and top with extra crumbled Biscoff cookies and a drizzle of cookie butter if you’re feeling extravagant! This ice cream pairs beautifully with a dollop of whipped cream, or you could serve it alongside a slice of warm pie or cake for a truly indulgent experience.
Recipe Variations
Let’s not stop at just one amazing flavor! Here are a few creative twists you can try with this base recipe:
- Chocolate Chip Cookie Butter Ice Cream: Fold in mini chocolate chips for that extra chocolatey goodness.
- Nutty Butter Swirls: Add swirls of your favorite nut butter (like almond or peanut butter) along with the cookie butter for a nutty flavor explosion.
- Fruit Infusion: Swirl in a strawberry, raspberry, or banana puree for a fruity contrast that brightens every scoop.
- Add Some Spirited Spirit: Infuse the base with a splash of your favorite liqueur, like Irish cream for an adult version!
- Dairy-Free Option: Substitute coconut milk and cream for a coconut-based ice cream that’s creamy and dreamy, just without the dairy.
Chef’s Notes
I’ll let you in on a little secret: the beauty of this recipe is its flexibility. I have a friend who loves to throw in a pinch of Himalayan salt before serving, claiming it brings out that cookie butter flavor even more! And as with all recipes, you might discover your unique approach as you make it a few times. Perhaps you feel like adding a pinch of sea salt to each scoop, or maybe you’ll discover a favorite topping that makes it your own. That’s what cooking is all about — experimenting and finding joy in the little things.
And let’s be real – there’s nothing like having the whole family enjoy a scoop of your homemade ice cream on a hot summer day. Trust me, it’s worth the wait!
FAQs and Troubleshooting
-
What if my ice cream is too hard after freezing?
If you find your ice cream has frozen too hard, let it sit out for about 5-10 minutes before scooping. If it’s still a bit icy, try mixing it with a splash of milk to soften it up. -
Can I make this without an ice cream maker?
Yes! If you don’t have an ice cream maker, pour the mixture into a large, shallow dish and place it in the freezer. Stir it every 30 minutes for the first 2-3 hours to break up ice crystals, then let it freeze until firm. -
How long will my ice cream last in the freezer?
Properly stored in an airtight container, this ice cream can last for about 1 month, although I seriously doubt it’ll stick around that long! -
Why didn’t my ice cream thicken?
This can happen if the mixture wasn’t cooked long enough to thicken. It’s crucial to ensure it coats the back of a spatula before straining. If you find yourself perplexed, feel free to reach out — I’m here to help!
Nutritional Info
While indulgent and sweet, this ice cream can be a delightful treat in moderation! Each serving may contain:
- Calories: Approximately 300-400 (based on 1/2 cup serving)
- Total Fat: 22g
- Saturated Fat: 12g
- Total Carbohydrates: 30g
- Sugars: 20g
- Protein: 5g
Remember, these values can vary based on your ingredients and any substitutions you make!
Are you feeling inspired yet? This Cookie Butter Ice Cream is a joy to make and share. Whether it’s a sunny day or a cozy night in, you can create memories with each scoop. Now, let’s get those spoons moving! Welcome to the yummy world of homemade ice cream — I’m so glad you’re here!
PrintCookie Butter Ice Cream
A creamy, dreamy dessert blending cookie butter and crumbled Biscoff cookies for an indulgent treat.
- Prep Time: 15 minutes
- Cook Time: 30 minutes
- Total Time: 45 minutes
- Yield: 8 servings 1x
- Category: Dessert
- Method: Churning
- Cuisine: American
- Diet: Vegetarian
Ingredients
- 1 cup granulated sugar, divided
- 6 large egg yolks
- 2 cups whole milk
- 2 cups heavy cream
- 1/2 tsp kosher salt
- 1/2 tsp cinnamon
- 1 tbsp vanilla extract
- 1/2 cup cookie butter
- 3/4 cup crumbled Biscoff cookies, divided
Instructions
- Prepare your ice cream base by combining sugar and milk in a saucepan and whisking over medium heat.
- Mix the egg yolks in a bowl until pale and thickened.
- Temper the egg yolks by slowly pouring hot milk into them while whisking.
- Thicken the mixture over medium-low heat until it coats the back of a spatula, about 10 minutes.
- Strain the mixture through a sieve into a bowl and stir in heavy cream, salt, cinnamon, and vanilla.
- Add the cookie butter and whisk until blended.
- Cool the mixture by covering it and chilling it in the fridge for at least 4 hours.
- Churn the mixture in an ice cream maker according to the manufacturer’s instructions.
- Fold in 1/2 cup crumbled Biscoff cookies.
- Freeze the ice cream in an airtight container for at least 4 hours before serving.
Notes
For a lighter version, substitute 2% milk for whole milk and use a sugar alternative if desired.
Nutrition
- Serving Size: 1/2 cup
- Calories: 350
- Sugar: 20g
- Sodium: 150mg
- Fat: 22g
- Saturated Fat: 12g
- Unsaturated Fat: 9g
- Trans Fat: 0g
- Carbohydrates: 30g
- Fiber: 0g
- Protein: 5g
- Cholesterol: 200mg
Keywords: ice cream, cookie butter, dessert, homemade ice cream, Biscoff cookies