The Sweet Symphony of Cherry Garcia Ice Cream: A Dreamy Delight
Ah, ice cream—the one dessert that can instantly transport us back to sun-soaked summers and carefree childhood days. If you’re anything like me, every scoop has a story. Perhaps it’s the taste of vanilla ice cream melting on a hot sidewalk or the delight of discovering sprinkles hiding in the bottom of a cup. And if there’s one ice cream flavor that dances on the palate and plays like the perfect summer soundtrack, it’s Cherry Garcia.
In this blog post, I’ll guide you through making your very own delightful batch of Cherry Garcia Ice Cream from scratch, simple enough that even your camera-shy kitchen friends will be eager to dive in. We’ll embrace the jazziness of ripe cherries, the richness of dark chocolate, and a creamy, dreamy base that hits all the right notes. So grab your trusty ice cream maker—let’s whip up something sweet!
A Scoop of Nostalgia
I still remember the first time I tasted Cherry Garcia. It was a balmy afternoon where the sun hung lazily in the sky, and I was parked on my favorite porch swing, my faithful dog curled up at my feet. A friend had surprised me with a tub of Cherry Garcia, freshly scooped, and as I took my first bite, something clicked. It wasn’t just ice cream; it was an experience. The sweet bursts of cherry melded with the rich chocolate, and I felt like I had stumbled upon a hidden gem.
We spent that afternoon swapping funny tales, our laughter echoing into the soft breeze, all while savoring the colorful swirls and delectable bites. Those moments became a cherished memory, reminding me how food can spark joy and bring people together. It’s this huge sense of comfort and bliss that I want to recreate in your kitchen. Let’s make your very own Cherry Garcia Ice Cream, perfect for all your sunny adventures!
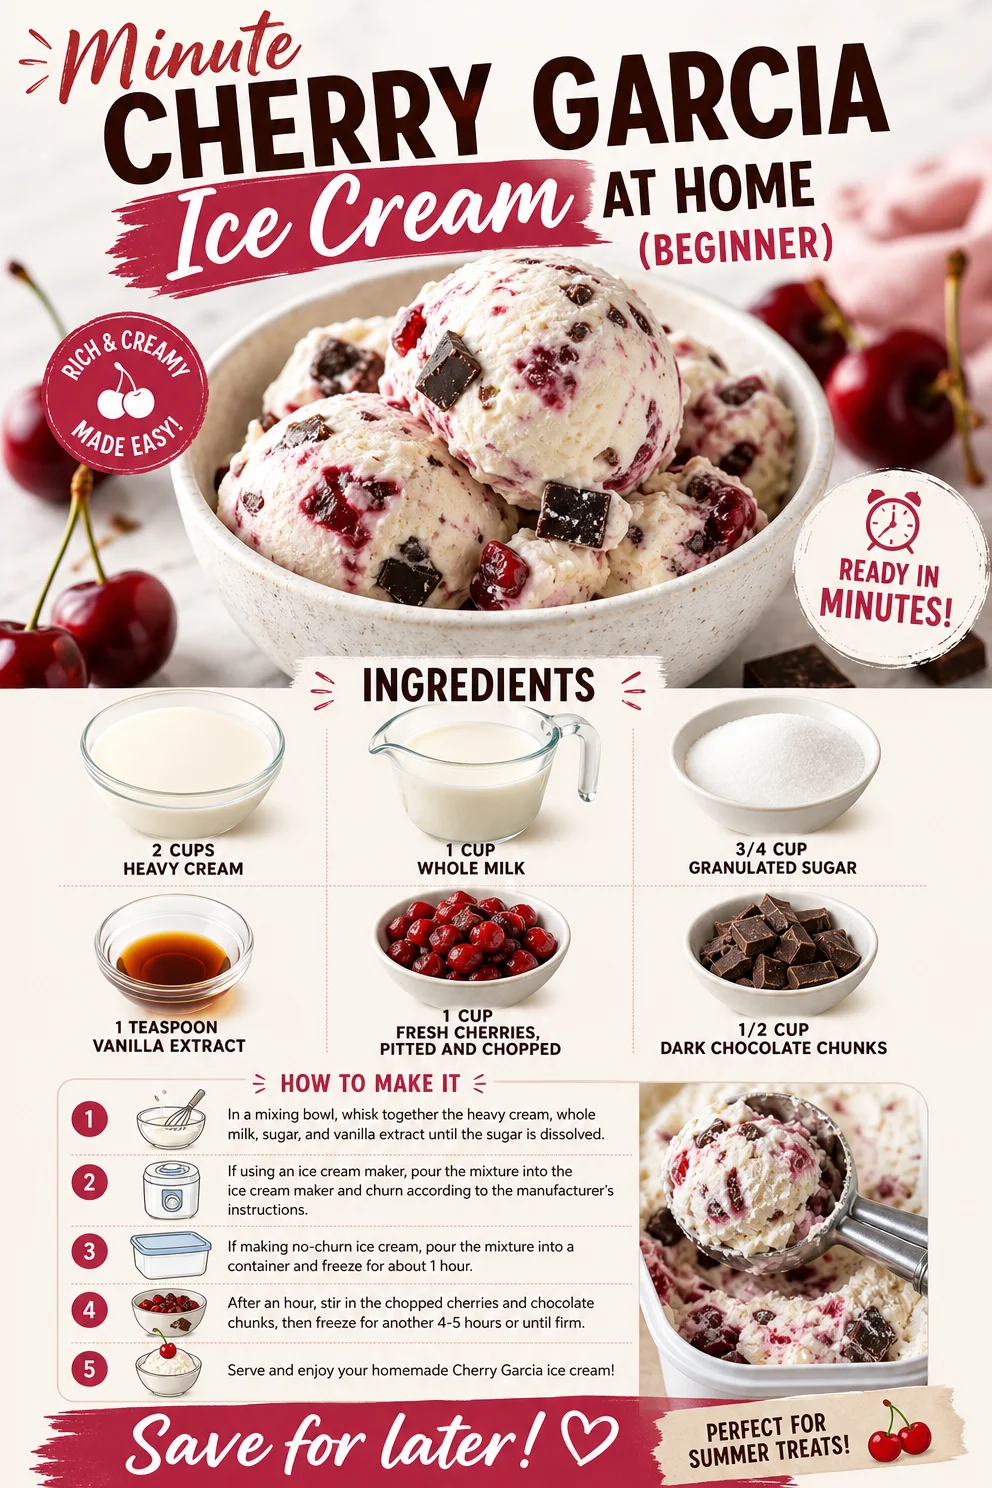
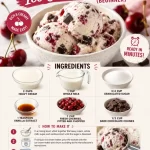
The Ingredients You’ll Need
Here’s what you’ll need to create this dreamy Cherry Garcia Ice Cream:
-
2 cups heavy cream
The base of our ice cream! Heavy cream adds richness and creaminess. You could swap it with half-and-half for a lighter touch, but the texture will be slightly less indulgent. -
1 cup whole milk
Whole milk gives a luscious mouthfeel. If you’re aiming for a dairy-free version, feel free to use almond milk or coconut milk, just keep in mind it may alter the flavor slightly. -
3/4 cup granulated sugar
This sweetener balances the tartness of the cherries. For variation, try using honey or maple syrup—both will lend a distinct flavor while sweetening the mixture. -
1 teaspoon vanilla extract
A must-have! Vanilla extract heightens the flavors and adds depth. If you’re feeling crafty, use homemade vanilla for an extra special touch. -
1 cup fresh cherries, pitted and chopped
Fresh, ripe cherries are the star of the show! If you can’t find fresh cherries, frozen works too—just thaw and drain them before using. -
1/2 cup dark chocolate chunks
Chocolate complements the cherry flavor beautifully. Use semi-sweet or even white chocolate if you want to mix things up a bit.
Now that you’re familiar with our ingredients, it’s time to roll up those sleeves and dive into the fun part: making this delicious ice cream!
Step-by-Step Instructions
-
Prepare Your Cherries
Start by pitting and chopping your fresh cherries. If you’re using frozen cherries, ensure they’re thawed and drained. It’s best to save a few cherry chunks for topping later! Set aside your chopped cherries in a bowl, and sprinkle a tablespoon of sugar over them. Allow them to macerate for about 10 minutes; this will draw out their natural juices and enhance their flavor. -
Mix the Creamy Base
In a large mixing bowl, whisk together the heavy cream, whole milk, sugar, and vanilla extract. Be sure to mix until the sugar is fully dissolved. This creamy concoction is going to be the heart of your ice cream, so be generous with your whisking! You can even use an electric mixer to speed things up. -
Fold in the Goodness
Once your base is ready, gently fold in your macerated cherries and dark chocolate chunks. Make sure they’re evenly distributed, but don’t over-mix or you’ll lose that lovely, creamy texture we’re aiming for. That will make your mouth water with each bite! -
Chill Out
Transfer your mixture into an airtight container and refrigerate it for at least 2 hours, or until it’s nicely chilled. This step is crucial; it helps the flavors to develop and create that velvety texture. -
Churn Away
Once the mixture is chilled, pour it into your ice cream maker. Follow the manufacturer’s instructions, usually churning for about 20-25 minutes until it’s thick and creamy. It’s like watching magic happen right before your eyes! -
Freeze and Firm Up
After churning, your ice cream will be soft-serve consistency. If you prefer a firmer texture, transfer it to a freezer-safe container and freeze for an additional 4 hours. Trust me; the wait is worth it!
Serving Suggestions
Now that we’ve successfully made our Cherry Garcia Ice Cream, it’s time to serve! Scoop generous portions into your favorite bowls or cones, and don’t forget to garnish with those reserved cherry chunks on top. A drizzle of chocolate sauce or a sprinkle of crushed nuts can take it to the next level. Want to feel fancy? Top with a sprig of mint or a dollop of whipped cream for that perfect Instagram-worthy moment!
Recipe Variations
- Cherry Garcia Brownie Sundae: Serve scoops of this ice cream on fudge brownies for a decadent twist.
- Berry Blend: Swap out cherries for a mixture of berries like strawberries, blueberries, and raspberries for a berry blast.
- Dairy-Free Delight: Swap the cream and milk for coconut cream and almond milk for a dairy-free version—still creamy and delicious!
- Nutty Surprise: Add some chopped walnuts or almonds for an added crunch and flavor contrast.
- Minty Twist: Incorporate a few drops of peppermint extract for a refreshing mint twist—this Cherry Garcia will feel like a whole new dessert!
Chef’s Notes
When I first created this Cherry Garcia recipe, I played around with different cherry varieties. Sweet Bing cherries work best for an explosion of flavor, while tart cherries can add a fun tang—a little experiment that ultimately helped shape this creation. One special moment was when I served this to my family during a backyard barbecue. Their reactions were priceless, and my niece declared it the “best ice cream ever.” I can’t argue with that! Remember, it’s all about having fun in the kitchen; don’t be afraid to make this recipe your own!
FAQs and Troubleshooting
-
Why did my ice cream turn out icy instead of creamy?
Over-churning or under-chilling the mixture before churning can lead to an icy texture. Ensure your base is cold before churning and keep an eye on the consistency. -
Can I use store-bought cherries instead of fresh?
Absolutely! Use quality jarred cherries, but drain them well and adjust the sugar if they’re packed in syrup. -
What if I don’t have an ice cream maker?
No worries! You can pour the mixture into a shallow dish, freeze it, and stir every 30 minutes until it’s firm. It takes a bit longer, but you’ll still get a delicious result. -
How should I store leftover ice cream?
Transfer any leftover ice cream to an airtight container and keep it in the freezer for up to two weeks. Just make sure to re-churn it briefly before serving if it freezes too hard!
Nutritional Info
Each serving of Cherry Garcia Ice Cream (1 scoop, about 1/2 cup) is approximately:
- Calories: 300
- Total Fat: 21g
- Saturated Fat: 12g
- Cholesterol: 70mg
- Sodium: 50mg
- Total Carbohydrates: 30g
- Sugars: 26g
- Protein: 3g
Now you have everything you need to create this delicious Cherry Garcia Ice Cream! I hope you enjoy this simple and nostalgic recipe as much as I do. Remember, every scoop tells a story, so don’t hesitate to make your own memories with it. Happy swirling!
PrintCherry Garcia Ice Cream
A delightful homemade Cherry Garcia Ice Cream featuring ripe cherries and rich chocolate chunks, perfect for summer.
- Prep Time: 10 minutes
- Cook Time: 25 minutes
- Total Time: 135 minutes
- Yield: 4 servings 1x
- Category: Dessert
- Method: Churning
- Cuisine: American
- Diet: Vegetarian
Ingredients
- 2 cups heavy cream
- 1 cup whole milk
- 3/4 cup granulated sugar
- 1 teaspoon vanilla extract
- 1 cup fresh cherries, pitted and chopped
- 1/2 cup dark chocolate chunks
Instructions
- Prepare your cherries by pitting and chopping them. Sprinkle a tablespoon of sugar over them and allow to macerate for about 10 minutes.
- Mix together the heavy cream, whole milk, sugar, and vanilla extract until the sugar is fully dissolved.
- Fold in the macerated cherries and dark chocolate chunks, ensuring they are evenly distributed.
- Chill the mixture in an airtight container for at least 2 hours.
- Churn the mixture in your ice cream maker according to the manufacturer’s instructions (usually about 20-25 minutes).
- Freeze the churned ice cream in a freezer-safe container for an additional 4 hours if a firmer texture is desired.
Notes
Serve with reserved cherry chunks on top and optional toppings like chocolate sauce, crushed nuts, or whipped cream.
Nutrition
- Serving Size: 1/2 cup (1 scoop)
- Calories: 300
- Sugar: 26g
- Sodium: 50mg
- Fat: 21g
- Saturated Fat: 12g
- Unsaturated Fat: 7g
- Trans Fat: 0g
- Carbohydrates: 30g
- Fiber: 1g
- Protein: 3g
- Cholesterol: 70mg
Keywords: Cherry Garcia, Ice Cream, Dessert, Homemade Ice Cream