Cherry Bars: The Sweet Slice of Nostalgia
Introduction
Hey there, fellow foodies! I’m so excited to share my favorite Cherry Bars recipe with you today. Imagine a dessert that’s not only incredibly delicious but also brings back some heartwarming memories. This is what Cherry Bars are all about—a delightful marriage of sweet cherry filling, buttery cake, and a simple glaze that just ties everything together perfectly.
Why do I love Cherry Bars so much? Not only are they a delightful treat, but they also remind me of those sunny afternoons spent baking in my grandmother’s kitchen. She was the queen of desserts, and her Cherry Bars were legendary among our family and friends. Every bite held a story—the laughter, the conversations, and the delicious aromas wafting through the house.
As a home cook, I believe that the kitchen is the heart of the home. These Cherry Bars embody that spirit. They’re not just about satisfying a sweet tooth; they’re about creating memories and sharing moments with the people we love. Plus, they’re super easy to whip up, making them perfect for weeknight desserts or weekend gatherings. So, grab your favorite baking dish and let’s dive into this juicy, cherry-filled adventure together!
Personal Story
I’ll never forget the first time I made Cherry Bars with my grandma. I was just a kid, standing on a stool to reach the counter. She had this special cherry pie filling that she would pour into a large bowl, and the sight of those bright red cherries swimming in syrup was utterly mesmerizing. As we mixed the batter and sprinkled some flour on my face for good measure (a family tradition, of course!), I felt a rush of excitement.
The best part? Grandma had this trick of letting us sneak a cherry or two when we thought no one was looking. Life was simple back then—just the warmth of the kitchen, the sweet scent of apples, and that fabulous feeling of creating something together.
Now, every time I bake these bars, I can hear her laughter echoing through the kitchen. I often find myself calling up friends to come over and enjoy a slice with a cup of coffee, just like we used to do. It’s funny how food connects us across generations, isn’t it? Each slice carries a little piece of nostalgia, just waiting to be savored.
Ingredients
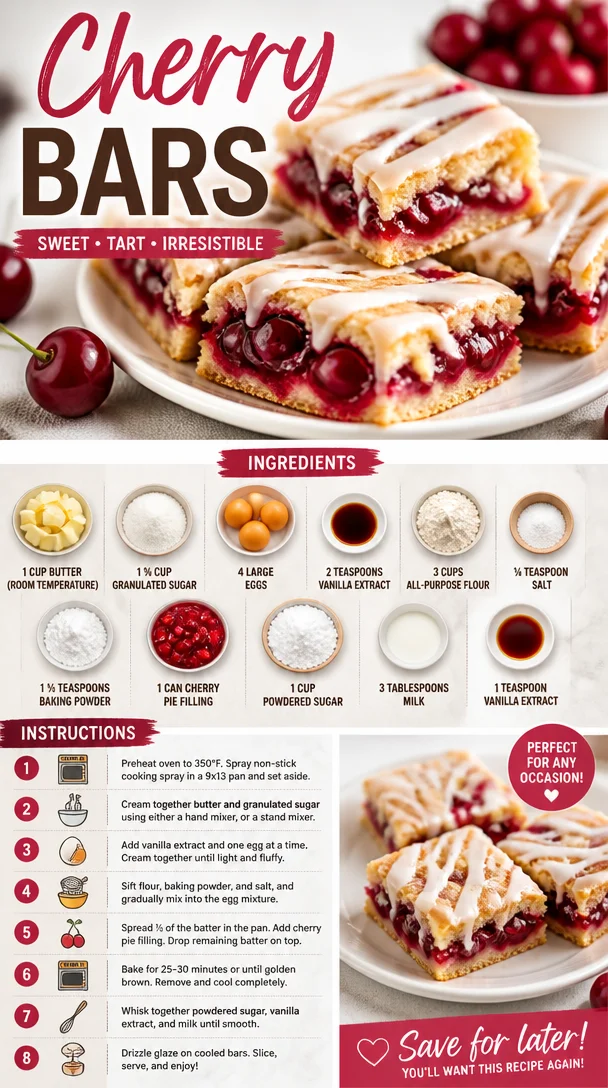
Let’s gather our ingredients! Here’s what you’ll need to make these delectable Cherry Bars, along with some helpful chef insights:
-
1 cup butter (room temperature): Use unsalted butter for better control over the sweetness. If you’re out of butter, you can substitute with an equal amount of coconut oil for a slightly different flavor.
-
1 ¾ cup granulated sugar: This sweetness brings the bars to life! Need a lower-sugar option? Substitute half of it with Stevia or coconut sugar. Just make sure to adjust to taste.
-
4 large eggs: These add richness and help bind all the ingredients together. In a pinch, for a vegan version, try using 1/4 cup of applesauce per egg.
-
2 teaspoons vanilla extract: The secret ingredient that amplifies the flavor! You can also try almond extract for a unique twist.
-
3 cups all-purpose flour: This gives the bars their structure. For a gluten-free option, swap it with a 1:1 gluten-free flour blend.
-
¼ teaspoon salt: Just a pinch! It enhances flavors in sweet dishes.
-
1 ½ teaspoons baking powder: This is our leavener, ensuring the bars rise beautifully. Don’t substitute with baking soda; they function differently.
-
1 can cherry pie filling (about 21 ounces): The star of the show! If you prefer, you can use fresh cherries or frozen ones sweetened with a bit of sugar.
-
1 cup powdered sugar: This will help make a lovely glaze. If you aim for a less sugary finish, use half the amount and add more milk gradually.
-
3 tablespoons milk: To thin out the glaze to the perfect consistency. Feel free to swap in almond milk or even a splash of cream for richness.
-
1 teaspoon vanilla extract (for the glaze): Same as above—because one can never have too much vanilla!
Step-by-Step Instructions
Now that we have our ingredients ready, let’s move on to creating these Cherry Bars. Don’t worry; I’ll guide you through it with some tips and tricks along the way!
-
Preheat your Oven: Preheat your oven to 350°F (175°C). This ensures our Cherry Bars bake evenly. Set the timer—your kitchen will smell divine in no time!
-
Prepare the Baking Dish: Grease a 9×13 inch baking dish with butter or cooking spray. You want these bars to slide right out easily! For some extra non-stick assurance, line the bottom with parchment paper.
-
Cream the Butter and Sugar: In a large bowl, use an electric mixer to beat the room-temperature butter and granulated sugar together until light and fluffy. This usually takes about 3-5 minutes. This step is super important because it incorporates air into the mixture, leading to a fluffy texture.
-
Add Eggs and Vanilla: Beat in the eggs, one at a time, followed by the vanilla extract. Mix until combined, pausing to scrape down the sides of the bowl to ensure everything is incorporated. You want this batter smooth and luscious!
-
Mix Dry Ingredients: In a separate bowl, whisk together the flour, salt, and baking powder. This step helps distribute the baking powder evenly throughout the flour, ensuring the bars rise consistently.
-
Combine Wet and Dry Ingredients: Gradually add the dry mixture to the wet mixture, mixing just until incorporated. Be careful not to overmix! You want just enough to combine; it’s okay if there are a few small lumps.
-
Spread the Batter: Pour half of the batter into the prepared baking dish, spreading it evenly with a spatula. This will be the base layer to cradle our cherry filling.
-
Add the Cherry Pie Filling: Gently pour the can of cherry pie filling over the batter. Use a spoon to spread it out evenly. Be generous here—it’s all about that cherry goodness!
-
Top with Remaining Batter: Dot spoonfuls of the remaining batter over the cherry filling. You won’t cover it completely, and that’s perfectly okay! The bits of cake peeking through will create a stunning look.
-
Bake: Place the baking dish in the oven and bake for 30-35 minutes, or until the edges are golden and a toothpick inserted in the center comes out clean. Your kitchen will begin to smell heavenly!
-
Cool and Glaze: Once baked, remove the dish from the oven and let it cool for at least 10 minutes. For the glaze, whisk together the powdered sugar, milk, and the additional teaspoon of vanilla extract in a small bowl until smooth. Drizzle it over the cooled bars.
-
Slice and Serve: Finally, slice your Cherry Bars into squares and serve them up! I recommend warming them slightly or enjoying them at room temperature.
Serving Suggestions
When you’re ready to serve, consider placing your Cherry Bars on a beautiful platter or individual dessert plates. For an extra touch, dust the tops with a sprinkle of powdered sugar or place a dollop of whipped cream on the side. A scoop of vanilla ice cream on top takes these bars to a whole new level of indulgence—trust me, you’ll want to try it!
Recipe Variations
Feel free to play around with these Cherry Bars! Here are a few variations to consider:
-
Chocolate Cherry Bars: Add a cup of chocolate chips to the batter for a delightful chocolate-cherry combo.
-
Nutty Bars: Toss in some chopped walnuts or pecans into the batter for added crunch and flavor.
-
Coconut Cherry Bars: Mix in shredded coconut for a tropical twist that pairs beautifully with cherries.
-
Almond Extract: Substitute almond extract for half of the vanilla for a more pronounced nutty flavor.
-
Lemon Zest: Add a teaspoon of lemon zest into the batter for a zesty brightness that complements the cherries beautifully.
Chef’s Notes
As with any recipe, I love to experiment, and these Cherry Bars are no exception! Over the years, I’ve played with different ingredients and toppings. One of my favorite tweaks was adding a hint of almond extract instead of vanilla—did I mention how dreamy that flavor combo is?
I’ve also added a streusel topping a few times, which brings in that crunchy texture we all can’t resist. Every time I make these, I think back to my grandma’s kitchen, where every ingredient held a story. It’s these little details that keep us connected to our culinary journeys.
FAQs and Troubleshooting
1. My bars are too dense. What went wrong?
If your Cherry Bars turned out dense, it might have been due to overmixing the batter. Remember, mix just until combined after adding the dry ingredients!
2. Can I use fresh cherries instead of canned pie filling?
Absolutely! Just pit and chop fresh cherries, and mix them with a bit of sugar and cornstarch to create a filling. Adjust the sugar based on how sweet your cherries are.
3. How do I store leftovers?
Store any leftover Cherry Bars in an airtight container at room temperature for up to 3 days or in the fridge for up to a week. They can also be frozen for up to 2 months; just thaw them before serving!
4. My glaze turned out too thick. What do I do?
If your glaze is too thick, gradually add in a little more milk until you reach your desired consistency. Remember, it should be pourable but still thick enough to sit on top of the bars.
Nutritional Info
- Serving Size: 1 bar (estimated)
- Calories: 250
- Total Fat: 12g
- Saturated Fat: 7g
- Cholesterol: 70mg
- Total Carbohydrates: 34g
- Dietary Fiber: 1g
- Sugars: 20g
- Protein: 3g
Conclusion
And there you have it! Delicious, homemade Cherry Bars that are sure to impress. Remember, the magic of cooking lies not just in the flavors but in the memories you create while making them. Whether it’s a gathering with loved ones or a cozy night in, these bars will certainly bring a smile to any face. Happy baking, friends, and I can’t wait to hear about your own Cherry Bar adventures! Let’s keep the culinary stories alive. 🍒✨
PrintCherry Bars
Delightful Cherry Bars embodying sweet cherry filling and buttery cake, perfect for sharing memories.
- Prep Time: 15 minutes
- Cook Time: 30 minutes
- Total Time: 45 minutes
- Yield: 12 servings 1x
- Category: Dessert
- Method: Baking
- Cuisine: American
- Diet: Vegetarian
Ingredients
- 1 cup unsalted butter (room temperature)
- 1 ¾ cup granulated sugar
- 4 large eggs
- 2 teaspoons vanilla extract
- 3 cups all-purpose flour
- ¼ teaspoon salt
- 1 ½ teaspoons baking powder
- 1 can cherry pie filling (about 21 ounces)
- 1 cup powdered sugar
- 3 tablespoons milk
- 1 teaspoon vanilla extract (for the glaze)
Instructions
- Preheat your oven to 350°F (175°C).
- Prepare a 9×13 inch baking dish with grease or cooking spray.
- Cream the butter and sugar together until light and fluffy.
- Add the eggs one at a time, mixing in the vanilla extract afterwards.
- Mix together the flour, salt, and baking powder in a separate bowl.
- Combine the dry ingredients with the wet ingredients until just blended.
- Spread half of the batter in the prepared baking dish.
- Add the cherry pie filling over the batter.
- Top with spoonfuls of the remaining batter.
- Bake for 30-35 minutes until golden.
- Cool for 10 minutes before glazing.
- Slice and serve warm or at room temperature.
Notes
Serve with whipped cream or vanilla ice cream for an extra indulgence.
Nutrition
- Serving Size: 1 bar
- Calories: 250
- Sugar: 20g
- Sodium: 100mg
- Fat: 12g
- Saturated Fat: 7g
- Unsaturated Fat: 5g
- Trans Fat: 0g
- Carbohydrates: 34g
- Fiber: 1g
- Protein: 3g
- Cholesterol: 70mg
Keywords: cherry bars, dessert, baking, cherry recipes, nostalgic dessert