
Crunchy, Sweet, and Oh-So-Delicious: Crispy Kiwi Chips
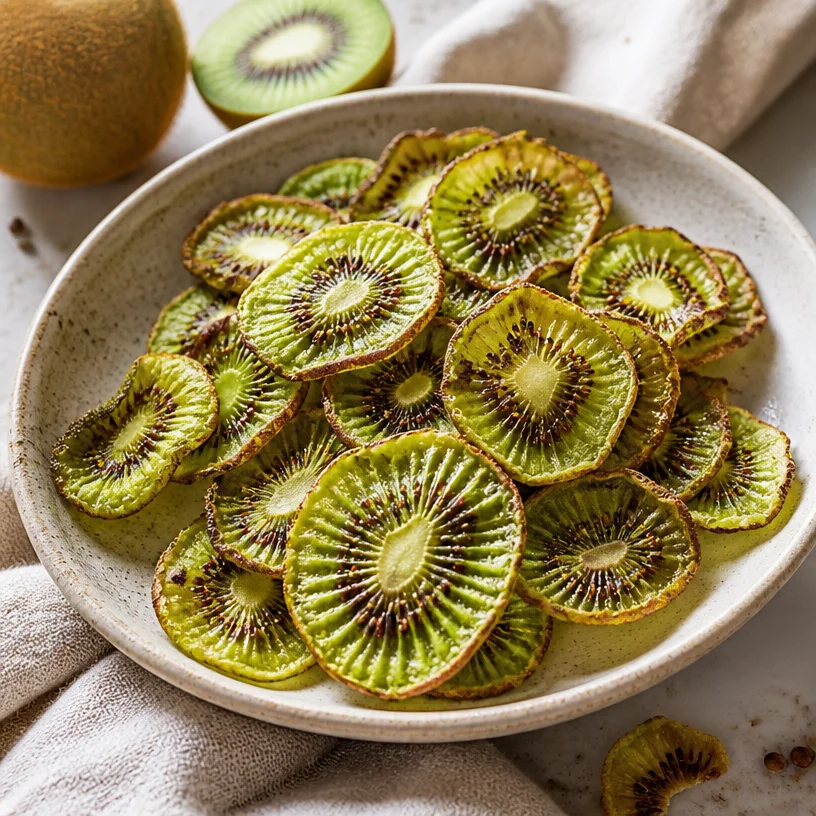
Hello, fellow food lovers and kitchen adventurers! Are you ready to dive into a lively culinary adventure that will brighten up your snack game? Today, I’m excited to share one of my all-time favorite treats: Crispy Kiwi Chips. These little gems offer a delightful crunch with a hint of sweetness, and they’re as nutritious as they are tasty! If you’ve ever wondered how you can transform a simple kiwi into a gourmet snack, you’re in the right place.
The Magic of Kiwi Chips
You know, there’s something truly special about taking an everyday fruit and turning it into an extraordinary treat. It’s an exciting experiment that takes you back to the simplicity of home cooking—back when my biggest achievement was mastering the art of snack-making!
Let me take you back to a sunny afternoon in my kitchen, where I first stumbled upon this delightful idea. I had a bunch of ripe kiwis that were just begging to be used. They were bright, green, and fragrant, but I was craving something crunchy. After a bit of thinking and a pinch of inspiration, I decided to slice them thin and pop them in the oven. The result? A crispy, tart-sweet snack that was absolutely addictive.
Each bite brought back memories of lazy summer afternoons when we’d lay under the sun, munching on fresh fruit and sharing stories with friends. Kiwi chips became not just a snack, but a conversation starter. You’d be surprised at how quickly your friends gather around when these crispy delights appear on the table!
Ingredients
Let’s break down the essentials for this incredible snack. You’ll want to gather the following ingredients:
-
Kiwi: The star of the show! Choose ripe, firm kiwis for the best results. If you can’t find kiwis, other fruits like bananas or apples can work, but they will yield different flavors and textures.
-
Sugar (optional): A sprinkle of sugar can help caramelize your kiwi slices and enhance their sweetness. Feel free to omit if you’re watching your sugar intake or if you prefer a tangy twist!
-
Lemon Juice (optional): A splash of lemon juice can brighten the flavor and add a light zing. It also helps prevent browning—a handy trick if you plan on serving them later.
-
Salt (optional): A tiny pinch of salt can amplify the flavor of the kiwis and create a contrast to their sweetness. Just a touch, though—balance is key!
Step-by-Step Instructions
Ready to whip up these crispy kiwi chips? Here’s how you do it!
-
Preheat Your Oven: Set the oven to 200°F (95°C). This low-and-slow method ensures that the kiwis dry out evenly without burning. Pro tip: Make sure the oven is fully preheated before you put the kiwi slices in—nobody likes a half-baked chip!
-
Prepare Your Kiwis: Start by slicing the kiwis thinly—about 1/8 inch thick. The thinner you slice, the crispier they’ll become! I often use a sharp knife for this, but a mandoline works wonders if you have one. Just keep those fingers safe!
-
Toss with Sugar and Lemon Juice (if using): If you’re adding sugar and lemon juice, toss the kiwi slices gently in a mixing bowl until well coated. The sugar will create a caramelized exterior, while the lemon juice adds a refreshing layer of flavor.
-
Arrange on a Baking Sheet: Line your baking sheet with parchment paper for easy cleanup. Spread the kiwi slices in a single layer, ensuring they’re not overlapping. This helps them crisp evenly. Remember: crowded chips are sad chips!
-
Bake it Low and Slow: Pop those beauties in the oven for about 3 hours. Yes, 3 hours! Patience is key here. You want to check occasionally and flip them halfway through to promote even drying. I like to set a timer— that way, I can read a book or sip some tea while they do their magic.
-
Cooling Time: Once they’re golden and crisp (not to worry if they still seem a bit soft; they’ll harden as they cool), take them out and let them rest for about 15 minutes. This is the hardest part, but trust the process – it’s worth the wait!
-
Enjoy or Store: Once cooled, crunch away! If you have leftovers (which is unlikely because they’re so addictive), store them in an airtight container to keep them fresh and crispy.
Serving Suggestions
Crispy kiwi chips are incredibly versatile. Serve them as a refreshing snack on their own, or elevate them by tossing them into a salad for added texture. You can also top Greek yogurt or a smoothie bowl with a sprinkle of these crunchy delights for a pop of color and flavor. They’re also a gorgeous and delicious garnish for cocktails or mocktails—imagine the conversation this will spark at your next gathering!
Recipe Variations
-
Mixed Fruit Chips: Try combining kiwis with other fruits like apples, pears, or strawberries. Just remember that different fruits will have different drying times, so keep an eye on them!
-
Spiced Kiwi Chips: Want to add a twist? Sprinkle cinnamon or cayenne pepper for a spicy-sweet version. Perfect for those who love a little kick!
-
Chocolate-Covered Variation: For a decadent treat, drizzle melted dark chocolate over the cooled kiwi chips and let them cure. Who says healthy snacks can’t be indulgent?
-
Herb-Infused Chips: For an adventurous take, consider infusing the sugar with dried herbs like rosemary or thyme. Trust me, this surprising combo will leave taste buds dancing!
-
Nut Butter Drizzle: Once cooled, you can drizzle a bit of almond or peanut butter over the chips for a satisfying crunch that packs extra protein.
Chef’s Notes
One of the best things about cooking is how recipes evolve over time. This crispy kiwi chips recipe started as a busy weeknight attempt to use up some ripe fruit, but it has since become a staple in my snack rotation. I’ve even used this method on other fruits, turning kitchen experiments into whole new ranges of snacks!
Most importantly, I love how easily this recipe fits into a busy lifestyle. It requires little attention once it’s in the oven, giving you freedom to tackle other tasks while you wait.
FAQs and Troubleshooting
My kiwi chips are chewy instead of crispy—what did I do wrong?
No worries! This may happen if your slices are too thick or if they didn’t bake long enough. Make sure to slice them thinly and ensure the oven temperature is accurate. Patience is key!
Can I make these in a dehydrator?
Absolutely! If you have a dehydrator, it’s a fantastic way to make these chips. Just set it to the recommended temperature for fruits and let it work its magic.
What if I don’t have parchment paper?
You can use a silicone baking mat for easy removal. In a pinch, a well-greased baking sheet can also work, but take care when removing the chips to avoid any breakage.
Can I store the chips for later? How long will they last?
Yes! When stored properly in an airtight container, they can last up to two weeks. Just keep an eye on them—if they start to lose their crunch, pop them back in the oven for a few minutes to revive them!
Nutritional Info
(For those curious about the health benefits, make sure to enjoy them in moderation!)
- Calories (per serving of 5 chips): Approximately 35 calories
- Total Carbs: 9g
- Dietary Fiber: 2g
- Sugars: 5g (with sugar added)
- Protein: 1g
And there you have it, my incredible friends—Crispy Kiwi Chips that are as fun to make as they are to eat! I hope you give them a try and enjoy the journey from fresh fruit to a crunchy treat. Whether you’re snacking solo or sharing with friends, I promise these little morsels will delight every time. Happy cooking, and let’s keep bringing joy to our kitchens!
PrintCrispy Kiwi Chips

Transform ripe kiwis into a crunchy, sweet snack with these easy baked kiwi chips, perfect for sharing or enjoying solo.
- Prep Time: 10 minutes
- Cook Time: 180 minutes
- Total Time: 190 minutes
- Yield: 4 servings 1x
- Category: Snack
- Method: Baking
- Cuisine: N/A
- Diet: Vegan
Ingredients
- 4 ripe Kiwis
- 1–2 tablespoons Sugar (optional)
- 1 tablespoon Lemon Juice (optional)
- A pinch of Salt (optional)
Instructions
- Preheat your oven to 200°F (95°C).
- Prepare the kiwis by slicing them thinly—about 1/8 inch thick.
- Toss with sugar and lemon juice (if using) until well coated.
- Arrange on a baking sheet lined with parchment paper in a single layer.
- Bake for about 180 minutes, flipping halfway through.
- Cool for 15 minutes before enjoying or storing.
Notes
These kiwi chips can last up to two weeks in an airtight container. Revive their crunch by popping them back in the oven if needed.
Nutrition
- Serving Size: 5 chips
- Calories: 35
- Sugar: 5g
- Sodium: 0mg
- Fat: 0g
- Saturated Fat: 0g
- Unsaturated Fat: 0g
- Trans Fat: 0g
- Carbohydrates: 9g
- Fiber: 2g
- Protein: 1g
- Cholesterol: 0mg
Keywords: kiwi chips, healthy snacks, baked snacks, fruit snacks