Banana Split Pudding Cups: A Nostalgic Treat with a Modern Twist
Welcome to the world of banana split pudding cups—a delicious dessert that is not just a feast for your taste buds but a delightful journey down memory lane! If you’re anything like me, you have fond memories of those summer afternoons when the sun was shining, and the only thing that mattered was a gigantic banana split dripping with vibrant syrups and piled high with whipped cream. Whether it was to cool down after a long day of playing outside or to sweeten up a family gathering, nothing could beat the joy of that classic dessert. With that spirit in mind, I’ve whipped up a simple and delightful recipe that captures the essence of a banana split but presents it in a fun, no-fuss cup format!
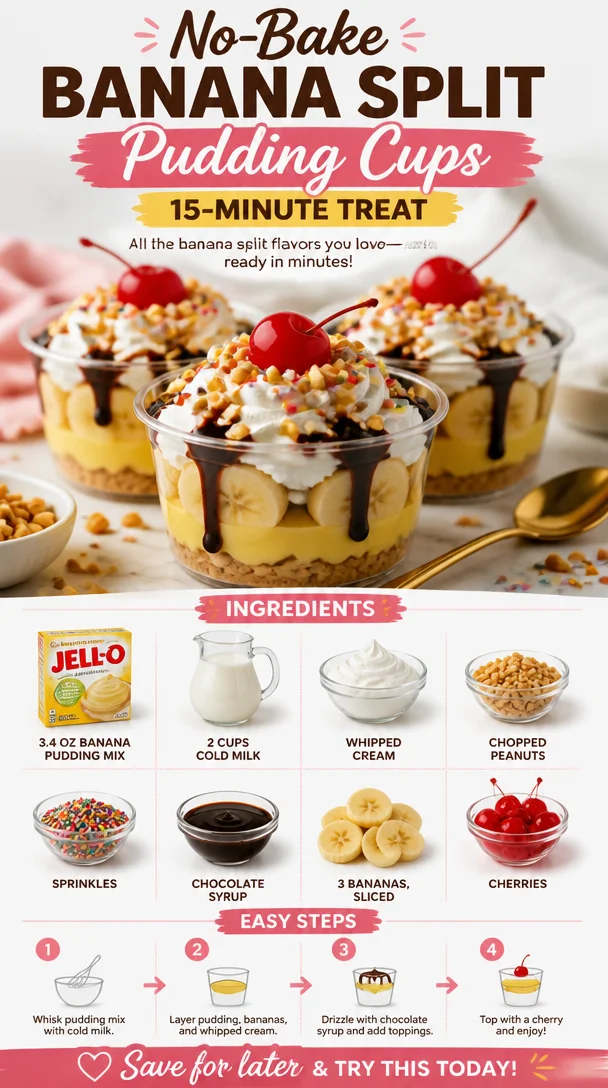
This recipe features layers of creamy banana pudding, ripe bananas, crunchy peanuts, and a drizzle of chocolate syrup—all topped with a cloud of whipped cream and, of course, a cherry on top! Perfect for any occasion, these pudding cups can bring a little joy to your weeknight dinner or impress your friends at a summer barbecue.
So grab your spoons, put on your favorite playlist, and let’s dive into making these banana split pudding cups!
A Blast from the Past
Growing up, my summers were spent at my grandmother’s house, where the kitchen always smelled of sweet delights and the laughter of family. She had this way of turning even the simplest of ingredients into something magical. My favorite memories? Watching her whip up a banana split sundae in seconds flat. She would slice bananas, layer on the ice cream, and then meticulously drizzle chocolate syrup while instructing me to add just the right sprinkle of nuts.
One sunny day, she decided to teach me how to make her beloved banana pudding. I remember feeling overwhelmed and excited at the same time. Watching her work her magic was mesmerizing; it all felt like a beautiful dance of flavors. Those moments held so much joy and love, and I knew right then that I wanted to share that same joy with others.
Fast forward to today; I’ve taken that happy childhood memory and transformed it into what I believe is a modern twist: banana split pudding cups. With layers of deliciousness and a sprinkle of nostalgia, these cups are perfect for sharing an old story while creating new ones.
Ingredients
Here’s what you’ll need to gather before diving into this delicious adventure:
-
3.4-ounce package banana pudding mix: The star of our show! You can find instant or cook-and-serve versions; just make sure you read instructions according to the one you choose. (You can substitute with any vanilla pudding mix for a different flavor twist!)
-
Milk (needed for pudding): Typically, whole milk adds the best creaminess, but feel free to use 2% or even almond milk for a dairy-free option!
-
⅓ cup chopped peanuts: Crunchy and salty, but if you have nut allergies, you can easily swap these for crushed graham crackers or seeds like sunflower for a similar crunch.
-
3 bananas, sliced: Naturally sweet and perfect for layering. Make sure to choose ripe bananas that still have some firmness so they hold their shape.
-
Whipped cream: You can use store-bought or homemade—use a whisk to whip heavy cream and a little sugar for a lovely light and fluffy topping.
-
Chopped peanuts (for garnish): A final sprinkle on top for that extra crunch!
-
Sprinkles: These add joyful pops of color and that classic sundae feel!
-
Chocolate syrup: An indulgent drizzle that brings everything together. You can use store-bought or even a homemade chocolate sauce if you’re feeling adventurous!
-
Cherries: The ultimate finishing touch. Whether you choose maraschino or fresh cherries, they add beautifully to the presentation.
Step-by-Step Instructions
Let’s roll up our sleeves and start layering those flavors!
-
Prepare the pudding: In a mixing bowl, combine your 3.4-ounce package of banana pudding mix with the required amount of milk (refer to the package for specific measurements, usually around 2 cups). Whisk until it’s smooth and combined, then let it sit for about five minutes to thicken up. (Chef’s tip: If you want an extra punch of banana flavor, you can mash one ripe banana into the pudding mixture!)
-
Slice the bananas: Take your bananas and slice them into bite-sized pieces. This makes for easy layering and munching. (Pro tip: To keep your bananas from browning too quickly, you can brush them lightly with lemon juice—this adds a little zing too!)
-
Chop your peanuts: Grab a cutting board and a sharp knife, and roughly chop your peanuts. You want a nice mix of larger pieces and smaller bits for variety. (If you’re using graham crackers instead, crush them into crumbs!)
-
Layer it up: Grab some cute cups or glasses for serving. Start with a layer of pudding, followed by a layer of sliced bananas, then sprinkle in some chopped peanuts. Repeat this layering until you reach the top of the cup. (Remember: Almost any glass will work—mix and match for a fun look!)
-
Top with whipped cream: Finish off with a generous dollop of whipped cream on each cup. Go big—life is too short for skimpy whipped cream! (Chef’s tip: To give it a more elegant touch, you can use a piping bag for piping the whipped cream into swirls!)
-
Add the finishing touches: Drizzle chocolate syrup over the whipped cream and sprinkle more peanuts and colorful sprinkles on top. Lastly, top each cup with a cherry to give it that classic sundae vibe. (A little drizzle of extra chocolate syrup on the sides of the glass makes it look extra fancy!)
-
Chill and serve: Let these beauties chill in the fridge for about 10-15 minutes. This allows the flavors to meld together while keeping everything cool and refreshing!
Serving Suggestions
When it’s finally time to serve, grab a tray and line them up for an appealing presentation. These cups are perfect for casual gatherings, birthday parties, or even just a Tuesday night treat. You can serve them with spoons in each cup, allowing your guests to dive right into the deliciousness!
For an added touch, consider serving with a side of extra chocolate syrup or a small bowl of fresh fruit for those who want to mix it up a bit.
Recipe Variations
Feel free to get creative with these pudding cups! Here are a few variations you can try:
-
Peanut Butter Banana Split Cups: Add a layer of peanut butter between the pudding and bananas for a nutty twist!
-
Berry Delight: Add fresh strawberries, blueberries, or raspberries to the mix for a fruity explosion.
-
Dairy-Free Delight: Substitute the pudding mix with a dairy-free version (coconut or almond-based) and use coconut cream for the whipped topping.
-
Chocolate Lover’s Dream: Use chocolate pudding mix instead of banana for a decadent chocolate sundae twist!
-
Banana Foster Inspiration: Drizzle some caramel sauce alongside the chocolate syrup for a banana foster flavor experience.
Chef’s Notes
As with everything I cook, this recipe has evolved over the years. I remember the first time I made banana pudding from scratch, and it was a delightful disaster! I had forgotten to check if I had all the necessary ingredients, and my pudding ended up more like soup! But it was in that moment that I realized the beauty of cooking lies in the imperfections and the excitement of experimentation.
These banana split pudding cups have become a family favorite, and I love that they can morph into whatever your heart desires. Remember, it’s all about making kitchen memories and celebrating flavors. So, don’t worry about following everything to the letter—wrap yourself in the joy of creating something special!
FAQs and Troubleshooting
1. What if my pudding didn’t thicken?
If your pudding is too runny, it may need more time to sit. If you used a cook-and-serve pudding, be sure you’ve brought it to a full boil during preparation. If you’re using it as a filling, a little extra cornstarch or pudding powder can help thicken it up.
2. How can I store leftovers?
These pudding cups can be stored in the fridge for 2–3 days. However, if you’ve added bananas, they might brown, so it’s best to assemble them fresh on the day you’re serving!
3. Can I make this ahead of time?
Definitely! You can prepare the components (pudding, sliced bananas, and whipped cream) a day in advance. Just layer them together shortly before serving to keep the freshness intact.
4. What should I do if the bananas start browning?
If your bananas brown, don’t fret! The pudding will still taste delicious. You can also toss the slices in a bit of lemon juice before assembling, which helps prevent browning without affecting the flavor.
Nutritional Info (optional)
While I generally don’t get too bogged down by the numbers because the joy of cooking is more about the flavors, here’s a rough estimate per serving:
- Calories: 250
- Total Fat: 10g
- Saturated Fat: 3g
- Carbohydrates: 38g
- Sugars: 20g
- Protein: 4g
And there you have it—your guide to creating delightful banana split pudding cups that are sure to become a favorite in your home! Remember, cooking is all about having fun and enjoying the process. So don’t rush; take your time and make these dessert cups your own. Happy cooking, my friends! 🍌🍦🍫
PrintBanana Split Pudding Cups

Delicious banana split pudding cups featuring layers of creamy banana pudding, ripe bananas, crunchy peanuts, and a drizzle of chocolate syrup, topped with whipped cream and a cherry.
- Prep Time: 15 minutes
- Cook Time: 0 minutes
- Total Time: 15 minutes
- Yield: 4 servings 1x
- Category: Dessert
- Method: Chilling
- Cuisine: American
- Diet: Vegetarian
Ingredients
- 3.4-ounce package banana pudding mix
- 2 cups milk
- ⅓ cup chopped peanuts
- 3 bananas, sliced
- Whipped cream
- Chopped peanuts (for garnish)
- Sprinkles
- Chocolate syrup
- Cherries
Instructions
- Prepare the pudding: In a mixing bowl, combine your banana pudding mix with milk. Whisk until smooth, then let it sit for about 5 minutes.
- Slice the bananas: Slice bananas into bite-sized pieces.
- Chop your peanuts: Roughly chop peanuts for variety.
- Layer it up: In cups, layer pudding, sliced bananas, and peanuts. Repeat until filled.
- Top with whipped cream: Add a generous dollop of whipped cream.
- Add the finishing touches: Drizzle chocolate syrup, sprinkle more peanuts and colorful sprinkles, and top with a cherry.
- Chill and serve: Refrigerate for 10-15 minutes before serving.
Notes
Feel free to substitute or experiment with different pudding and toppings. Keep bananas from browning by brushing with lemon juice.
Nutrition
- Serving Size: 1 cup
- Calories: 250
- Sugar: 20g
- Sodium: 180mg
- Fat: 10g
- Saturated Fat: 3g
- Unsaturated Fat: 5g
- Trans Fat: 0g
- Carbohydrates: 38g
- Fiber: 2g
- Protein: 4g
- Cholesterol: 10mg
Keywords: banana pudding, dessert cups, nostalgic dessert, banana split, summer treat