The Best Cherry Crumble: A Sweet Slice of Summer
Ah, summer — a glorious season filled with sunshine, laughter, and, of course, mouthwatering fruits! Among the bounty of sweet treasures the season offers, cherries hold a special place in my heart. Their juicy sweetness and vibrant color make them irresistible, especially when nestled into a crispy, buttery crumble. Today, we’re diving into the delightful world of Cherry Crumble — a dessert that’s as easy to make as it is pleasing to the taste buds.
Imagine this: You’ve had a long day, but the sun is still shining and the scent of fresh cherries wafts through your kitchen. You want something sweet but uncomplicated, something that sings “summer” with each bite. This Cherry Crumble fits the bill perfectly. It’s a warm, comforting dish that doesn’t demand hours in the kitchen, and it comes together faster than you can say “dessert!” Get ready to fall in love with this simple yet scrumptious treat that captures the essence of summer!
A Nostalgic Bite
Growing up, my family had a tradition of setting aside weekends for a little mini-adventure in the kitchen. One particular summer stands out vividly in my memory. My grandma had a bountiful cherry tree in her backyard, and I could hardly wait for the day when we would harvest those plump, red gems. The sun would be shining down, and we’d spend hours picking cherries, chatting, and sneaking bites of the juicy fruit right off the branch!
With our basket overflowing, we’d dash inside to create the most delicious Cherry Crumble. Grandma always said, “A little crumble goes a long way,” and that saying has stuck with me over the years. The sweet-tart cherries topped with a fluffy, buttery crumble — it was heaven in every bite! Now, every time I whip up this Cherry Crumble, I feel that same joy and warmth, and I can practically hear Grandma’s laughter ringing in my ears. Let’s recreate that magic in your kitchen!
Ingredients
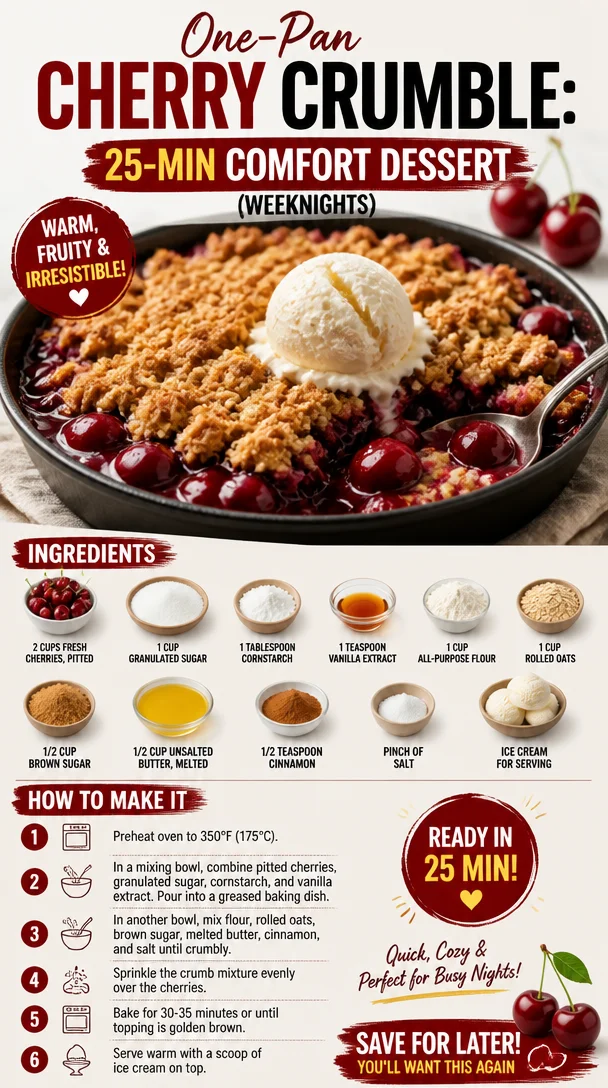
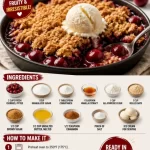
Here’s what you’ll need to create this delicious Cherry Crumble:
-
2 cups fresh cherries, pitted
Sweet, juicy cherries are the star of this dessert! You can use Bing or Rainier cherries for their sweetness. If cherries are out of season, feel free to use frozen ones — just thaw and drain them before use. -
1 cup granulated sugar
This adds the necessary sweetness to balance the tartness of the cherries. For a healthier twist, try substituting with coconut sugar or a natural sweetener like Stevia. Adjust to taste, though — not all sweeteners are created equal! -
1 tablespoon cornstarch
Cornstarch acts as a thickener, ensuring the cherry filling is perfectly gooey and not too runny. You can swap it with arrowroot powder if you prefer a gluten-free option. -
1 teaspoon vanilla extract
This adds depth to the flavor, enhancing that sweet cherry goodness. Feel free to experiment with almond extract for a twist! -
1 cup all-purpose flour
This forms the base of the crumble. If you want a gluten-free version, almond flour or a gluten-free flour blend will work wonders. -
1 cup rolled oats
Old-fashioned oats not only add a lovely chewyness but also make the crumble more filling. For a nutty flavor, consider using steel-cut oats or replacing them with crushed nuts. -
1/2 cup brown sugar
Brown sugar brings a lovely caramel-like flavor to the crumble. You could swap this out for brown coconut sugar for a healthier option. -
1/2 cup unsalted butter, melted
Butter enriches the crumble and gives it that irresistible crunch. You could use coconut oil if you’re looking for a dairy-free alternative. -
1/2 teaspoon cinnamon
Cinnamon brings warmth and flavor to the dish. Add nutmeg for a little extra kick! -
Pinch of salt
A little salt enhances the sweetness and balances the flavors beautifully. -
Ice cream for serving (optional)
Because what’s a crumble without a scoop of ice cream on top? Vanilla is classic, but feel free to get creative—coconut or even chocolate ice cream would be divine!
Step-by-Step Instructions
Now that you’ve gathered your ingredients, it’s time to get cooking! Follow these simple steps to create your Cherry Crumble.
-
Preheat Your Oven
Preheat your oven to 350°F (175°C). This step is crucial as it ensures even baking — no one wants a soggy crumble! -
Prepare the Cherry Filling
In a medium bowl, combine your pitted cherries, granulated sugar, cornstarch, and vanilla extract. Toss everything gently until the cherries are well coated. The sugar will draw out the juices, creating a lovely syrupy filling. Let this mixture sit while you prepare the crumble topping — it’s like a mini warming-up session for those cherries! -
Make the Crumble Topping
In another bowl, combine flour, rolled oats, brown sugar, melted butter, cinnamon, and the pinch of salt. Use your fingers or a fork to mix everything until it resembles coarse crumbs (this is where the magic happens!). Don’t stress about making it perfect; rustic is the name of the game! -
Assemble the Dish
Pour the cherry filling into a greased 9-inch baking dish. Use a spatula to spread it evenly across the bottom. Next, sprinkle the crumble topping generously over the cherries. This is your chance to make it as thick or as thin as you like — more crumble means more crunch! -
Bake to Perfection
Place your dish in the preheated oven and bake for 35–40 minutes, or until the topping is golden brown and the cherries are bubbling. This timing may vary based on your oven, so keep an eye on it! The aroma will be intoxicating. -
Cool and Serve
Once it’s out of the oven, let your Cherry Crumble cool for about 10-15 minutes. This resting time allows the juices to settle, ensuring each spoonful is perfectly balanced. Trust me, it will be hard to resist diving in right away, but the wait will be worth it!
Serving Suggestions
Serve your warm Cherry Crumble with a scoop of creamy ice cream or a dollop of whipped cream on top for that ultimate indulgent touch. You can also sprinkle some chopped nuts or a drizzle of caramel sauce for extra flair. Presentation matters, so feel free to dish it up in individual ramekins for a fancy gathering, or keep it rustic and serve it straight from the baking dish. Either way, it’s going to be a hit!
Recipe Variations
Looking to switch things up? Here are some fun ideas to customize your Cherry Crumble:
- Mixed Berry Crumble: Combine cherries with raspberries or blueberries for a delightful mixed berry medley!
- Spiced Rum Twist: Add a tablespoon of spiced rum to the cherry filling for an adult-only version that packs a flavor punch.
- Nutty Crumble Variation: Incorporate chopped pecans or walnuts into the crumble topping for added crunch and depth.
- Zesty Citrus: Try adding a teaspoon of lemon or orange zest into the cherry filling for a refreshing twist.
- Gluten-Free Option: Use gluten-free substitutes as mentioned in the ingredients section to make this dish friendly for gluten-sensitive friends.
Chef’s Notes
Cherry Crumble has come a long way since those childhood days in my grandma’s kitchen. While I still cherish the classic version, I love experimenting with seasonal fruits and different flavor profiles. The joy of baking doesn’t just come from the end result but from the stories we create along the way. So whether you make it just as I’ve shared here or put your spin on it, remember that the best ingredients are love and laughter!
Have I mentioned that one time I accidentally used salt instead of sugar? Let’s just say it was a memorable dessert experience for all the wrong reasons! Learning opportunities like those keep us all humble in the kitchen, right?
FAQs and Troubleshooting
-
Why is my crumble soggy?
Make sure to let the filling rest for a bit after mixing. This allows the cherries to release their juices and helps thicken up the filling. If it’s soggy, you may have also used too much sugar. When in doubt, start with less and taste as you go! -
Can I use frozen cherries?
Absolutely! Just thaw and drain them first to avoid excess moisture. This way, your crumble will still come out beautifully. -
Can I make this gluten-free?
Yes! Simply swap out the all-purpose flour for gluten-free alternatives and enjoy without worry. -
What should I do with leftovers?
Store any leftovers in an airtight container in the fridge for up to 3 days. Reheat in the oven or microwave for that warm, comforting treat again!
Nutritional Info
While I don’t focus heavily on the “calories-in, calories-out” aspect, it’s good to remember that everything in moderation is key. This Cherry Crumble is a delightful dessert that can be enjoyed without any guilt when shared with loved ones.
So there you have it! Your guide to the perfect Cherry Crumble that captures the essence of summer and nostalgia in every bite. Remember, the kitchen is a place for joy and creativity. So turn on some music, roll up your sleeves, and let’s make food that makes us feel good. Cheers to great flavors and even better memories!
PrintThe Best Cherry Crumble
A warm and comforting Cherry Crumble that perfectly captures the essence of summer.
- Prep Time: 15 minutes
- Cook Time: 40 minutes
- Total Time: 55 minutes
- Yield: 6 servings 1x
- Category: Dessert
- Method: Baking
- Cuisine: American
- Diet: Vegetarian
Ingredients
- 2 cups fresh cherries, pitted
- 1 cup granulated sugar
- 1 tablespoon cornstarch
- 1 teaspoon vanilla extract
- 1 cup all-purpose flour
- 1 cup rolled oats
- 1/2 cup brown sugar
- 1/2 cup unsalted butter, melted
- 1/2 teaspoon cinnamon
- Pinch of salt
- Ice cream for serving (optional)
Instructions
- Preheat your oven to 350°F (175°C).
- In a medium bowl, combine your pitted cherries, granulated sugar, cornstarch, and vanilla extract.
- Toss everything gently until the cherries are well coated.
- In another bowl, combine flour, rolled oats, brown sugar, melted butter, cinnamon, and the pinch of salt.
- Use your fingers or a fork to mix everything until it resembles coarse crumbs.
- Pour the cherry filling into a greased 9-inch baking dish.
- Sprinkle the crumble topping generously over the cherries.
- Place your dish in the preheated oven and bake for 35–40 minutes.
- Let your Cherry Crumble cool for about 10-15 minutes before serving.
Notes
Serve warm with ice cream or whipped cream. This dish can also be made gluten-free by swapping all-purpose flour for gluten-free alternatives.
Nutrition
- Serving Size: 1 serving
- Calories: 350
- Sugar: 30g
- Sodium: 150mg
- Fat: 17g
- Saturated Fat: 10g
- Unsaturated Fat: 4g
- Trans Fat: 0g
- Carbohydrates: 50g
- Fiber: 3g
- Protein: 4g
- Cholesterol: 30mg
Keywords: cherry crumble, summer dessert, easy recipe