

Indulge in Delight: Chocolate Dipped Waffle Cone Fruit and Yogurt Cups
Welcome to the sweet side of life! Today, we’re diving into a whimsical treat that combines the crunchy bliss of waffle cones with the creamy goodness of yogurt and the freshness of juicy berries. Say hello to Chocolate Dipped Waffle Cone Fruit and Yogurt Cups – the ultimate dessert that’s not just delicious but also super fun to make!
Whether you’re looking for an enchanting way to impress guests, a simple treat to whip up on a Sunday afternoon, or a playful dessert for the kids that they’ll absolutely love, these cups are your go-to solution. Trust me; they’re as delightful to eat as they are to make. Plus, they’re a great way to enjoy a hit of chocolate while sneaking in some nutritious fruit!
A Bite of Nostalgia
I’ll never forget the first summer I spent layering sweet toppings into waffle cones with my family. We’d huddle in the kitchen, surrounded by all kinds of goodies—ice cream, sprinkles, chocolate syrup, and, of course, my favorite, fruit! One year, I decided to take a leap and turned those traditional ice cream cones into vibrant yogurt and fruit cups. With some melted chocolate drizzled over the edges, it wasn’t long before everyone was raving about my fruity creations. It felt like I had magically transformed simple ingredients into a delightful masterpiece.
Every scoop was a reminder of sunny days spent together and creativity bubbling in the kitchen. Inspired by those sweet memories and the joy of mingling flavors, I’ve evolved that concept into a delightful treat that screams, “Let’s celebrate the simple pleasures!” Get ready to channel your inner pastry chef and transform ordinary moments into delicious memories.
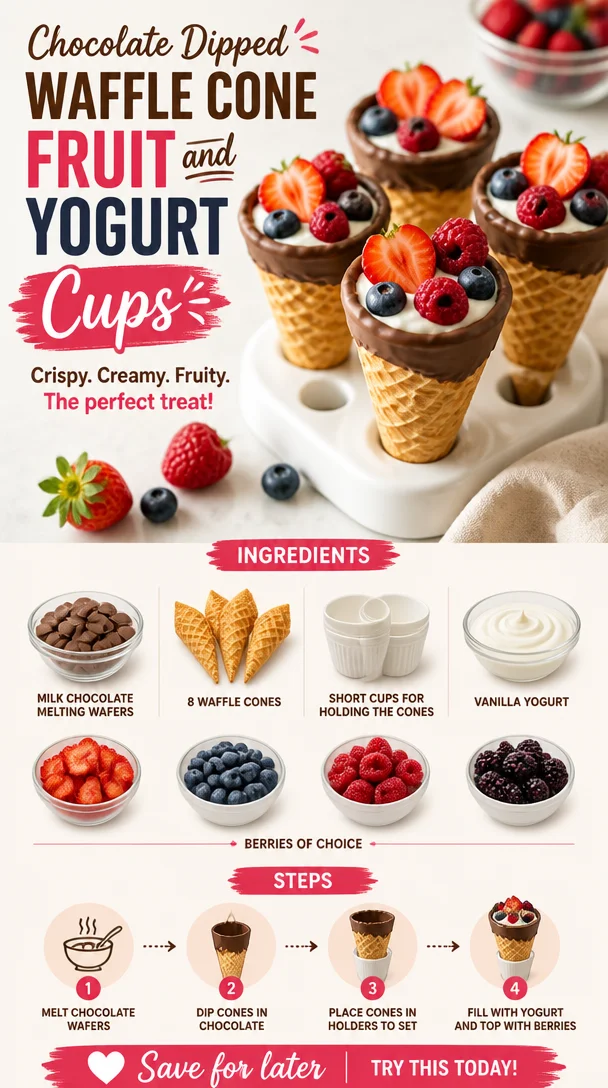
Ingredients
Here’s what you’ll need to bring these heavenly cups to life:
-
Milk Chocolate Melting Wafers
These delightful wafers are the magic touch! They melt beautifully and harden back to a smooth finish that’s perfect for dipping. If you’re feeling adventurous, try dark chocolate or white chocolate wafers for a fun twist! -
8 Waffle Cones
Look for sturdy waffle cones that can support your cups. If you can’t find them, sugar cones can work too! Just note that they’re a little less crunchy and have a different texture. -
Short Cups for Holding the Cones
These cups will be your trusty sidekick, providing support for the cones filled with yogurt goodness. Clear plastic cups are a great option, but feel free to go chic with small glass ones! -
Vanilla Yogurt
A creamy base that pairs perfectly with fruit. Use Greek yogurt for a protein boost, or try coconut yogurt for a dairy-free alternative. -
Berries of Choice
I love using fresh strawberries, blueberries, or raspberries, but really, any fruit you adore works! The beauty of this recipe is that you can switch it up based on the season or your cravings.
Step-by-Step Instructions
Now, let’s get to the fun part! Buckle up, my fellow kitchen adventurers; here’s how to craft these irresistible chocolate-dipped mouthfuls:
-
Melt the Chocolate Wafers
Begin by placing your milk chocolate melting wafers in a microwave-safe bowl. Heat them in 30-second intervals, stirring in between, until they’re smooth and completely melted. This should take about 1-2 minutes. (Pro tip: Avoid overheating, as burnt chocolate isn’t any fun; it can seize up on you!) -
Dip the Waffle Cones
Take a waffle cone and dip the top portion into the melted chocolate, swirling it gently as needed to coat about 1-2 inches down the cone. Let the excess drip off, then place it upside down on parchment paper or a cooling rack. Repeat with the remaining cones. (If you’re feeling fancy, sprinkle some chopped nuts or sprinkles onto the dip before the chocolate hardens for extra flair!) -
Let the Chocolate Set
Allow the dipped cones to set for about 15 minutes at room temperature or pop them in the fridge for quicker results. You want the chocolate to be firm but not rock solid—it should break easily to take a bite. -
Prep the Yogurt
While the cones are setting, grab a mixing bowl. Stir your vanilla yogurt until it’s smooth and creamy. If you’d like to sweeten it or add extra flavor, mix in honey, agave, or a splash of vanilla extract! -
Layer the Yogurt and Berries
Once your cones are ready, fill each one with a generous scoop of yogurt. Top it with a layer of berries—feel free to mix and match! Press them into the yogurt gently, so they’re nestled in nicely. -
Add More Yogurt and Finish the Cups
Add another scoop of yogurt on top of the berries, and then finish with a few more berries, giving each cup a vibrant, colorful crown! (Cooking hack: If you want to make these in advance, you can prep the cones a few hours ahead, but fill them right before serving to keep that crunch!)
Serving Suggestions
When it comes to serving, you want to play up the charming vibe of these cups. Place them upright in the short cups to keep everything stable and make it look pretty. If you’re feeling extra whimsical, drizzle some melted chocolate over the top for a dazzling finish or sprinkle with additional crushed nuts or a dash of cinnamon for flair. Let your creativity flow!
Recipe Variations
Feel free to put your spin on these cups! Here are some fun ideas to jazz things up:
- Tropical Twist: Use coconut yogurt and top with mango chunks and banana slices.
- Berry Medley: Combine multiple types of berries, such as strawberries, blackberries, and blueberries, for a colorful burst.
- Nutty Delights: Add a layer of granola before the yogurt for extra crunch and fiber.
- Chocolate Lover’s Dream: Swap out the vanilla yogurt for chocolate yogurt and layer it with strawberries and banana slices.
- Flavor Infusion: Mix in a dash of matcha or a sprinkle of cinnamon into your yogurt for a unique flavor dimension.
Chef’s Notes
This recipe has become a staple in my kitchen because it’s just so darn fun and adaptable! It takes me back to those summer days filled with laughter and creativity. Every time I whip these up, I can’t help but think of my little cousins running around while we made a mess in the kitchen. They loved creating their own combinations, which always added a dash of pure joy to our family gatherings.
Over time, I’ve found that trying new fruits and yogurt flavors keeps it exciting, so don’t hesitate to experiment! Remember, cooking is all about having fun and expressing yourself.
FAQs and Troubleshooting
1. My chocolate seized while melting! What did I do wrong?
Seizing happens when chocolate gets too hot or comes into contact with moisture. Keep a close eye on it and stick to 30-second intervals for microwaving—less is more!
2. Could I use something other than yogurt?
Absolutely! If yogurt isn’t your jam, consider using whipped cream, pudding, or even a dairy-free alternative such as cashew or almond yogurt.
3. How can I make this recipe more kid-friendly?
Kids will love the hands-on aspect! Have them decorate and assemble their own cups. You can also swap berries for their favorite fruits—like peaches or apples!
4. Can I prepare these ahead of time?
You can make the dipped cones in advance and store them in an airtight container. Fill them with yogurt and fruit just before serving to keep everything fresh and crunchy.
Enjoy your time in the kitchen, and remember to make it an enjoyable experience—just like those sunny summer days filled with laughter and delicious treats! These Chocolate Dipped Waffle Cone Fruit and Yogurt Cups will surely delight and become a new favorite in your home. So, grab your ingredients, turn up your playlist, and let’s make something fantastic together!
PrintChocolate Dipped Waffle Cone Fruit and Yogurt Cups

A delightful dessert combining crunchy waffle cones with creamy yogurt and fresh berries, perfect for impressing guests or enjoying with family.
- Prep Time: 10 minutes
- Cook Time: 15 minutes
- Total Time: 25 minutes
- Yield: 8 servings 1x
- Category: Dessert
- Method: Assembling
- Cuisine: American
- Diet: Vegetarian
Ingredients
- 8 Waffle Cones
- 1 cup Milk Chocolate Melting Wafers
- Short Cups for Holding the Cones
- 2 cups Vanilla Yogurt
- 2 cups Berries of Choice (strawberries, blueberries, or raspberries)
Instructions
- Melt the chocolate wafers in a microwave-safe bowl, heating in 30-second intervals until smooth.
- Dip the top portion of each waffle cone into the melted chocolate, swirling as needed to coat.
- Let the dipped cones set for about 15 minutes at room temperature or refrigerate for quicker results.
- Prep the vanilla yogurt by stirring until smooth, adding honey or vanilla extract if desired.
- Layer each cone with a scoop of yogurt, followed by a layer of berries.
- Add another scoop of yogurt on top, finishing with more berries.
Notes
For added flair, consider drizzling melted chocolate over the top or sprinkling with crushed nuts.
Nutrition
- Serving Size: 1 cup
- Calories: 200
- Sugar: 15g
- Sodium: 100mg
- Fat: 8g
- Saturated Fat: 4g
- Unsaturated Fat: 4g
- Trans Fat: 0g
- Carbohydrates: 30g
- Fiber: 2g
- Protein: 4g
- Cholesterol: 5mg
Keywords: dessert, chocolate dipped, yogurt cups, fruit, waffle cones