Mini Cannoli Cups: A Bite-Sized Delight
Welcome to DelaneyBrooks.com, friends! Today, I’m excited to share a recipe that’s not just delicious; it’s downright adorable! Mini Cannoli Cups are the perfect way to indulge your sweet tooth without the guilt of diving into an entire dessert. These little bites of heaven combine the classic flavors of traditional Italian cannoli with the effortless charm of mini pastry shells. So buckle up, because we’re about to embark on a delightful culinary adventure!
A Sweet Memory
Growing up, dessert was always a big deal in my family. My grandmother was the reigning queen of sweets, and every Sunday, she’d invite us all over for a big meal that we knew would end with something spectacular. One of my absolute favorites were her cannoli. She took such pride in making the perfectly crispy shells filled with the smoothest, sweetest ricotta and a sprinkle of chocolate chips. The smell of cinnamon wafting through her kitchen—ah, pure magic!
I remember one particular Sunday when I was about ten. Grandma had promised to teach me how to make her famous cannoli. I was so excited! Little did I know, the process was a bit more complicated than I expected. Between rolling the dough and frying the shells, it felt like a marathon! But, oh, when we finally took our first bites, all the hard work faded away in a blissful haze of sweet satisfaction.
Fast-forward a few years, and as I began experimenting in my own kitchen, I realized I wanted to share that joy without overwhelming anyone. Thus, my Mini Cannoli Cups were born: the essence of cannoli without all the fuss! Let’s dive into making these delightful treats!
Ingredients
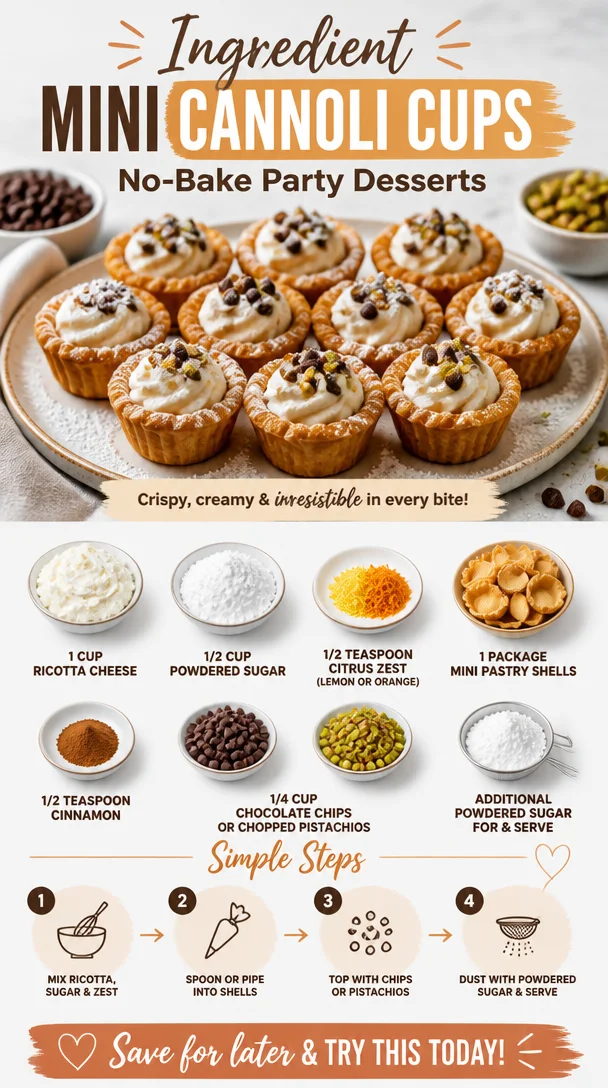
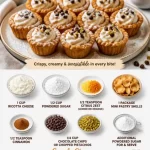
Here’s what you’ll need to make these Mini Cannoli Cups:
-
1 cup ricotta cheese
The star of the show! Look for whole milk ricotta for a creamy texture. If you can’t find fresh ricotta, the store-bought kind works perfectly too. You can substitute it with mascarpone for an even richer flavor. -
1/2 cup powdered sugar
This adds the sweetness that balances the flavors beautifully. If you want a healthier alternative, try using coconut sugar or a sugar substitute—just keep in mind that it might change the texture slightly! -
1/2 teaspoon citrus zest (lemon or orange)
A little zest goes a long way! It brightens up the filling, making it fresh and vibrant. If you’re out of citrus fruits, a splash of vanilla extract can work in a pinch. -
1 package mini pastry shells
You can buy these pre-made at the store, or if you’re feeling adventurous, try your hand at making them from scratch. They add a delightful crunch—just remember to bake them until golden brown! -
1/2 teaspoon cinnamon
This warm spice adds depth to the filling. Feel free to swap it out for nutmeg or cardamom if you want to change things up. -
1/4 cup chocolate chips or chopped pistachios
Chocolate chips give that classic cannoli vibe, while pistachios add a lovely crunch and slight nuttiness. It’s your choice—mix and match if you’re feeling fancy! -
Additional powdered sugar for dusting
A light dusting at the end is the cherry on top—literally! It makes everything look more inviting.
Step-by-Step Instructions
Now for the fun part! Let’s whip up these Mini Cannoli Cups step-by-step:
-
Prep the Filling
In a medium bowl, combine the ricotta cheese and powdered sugar. Using a spatula, mix until smooth and creamy. This will ensure that the sugar fully incorporates without any graininess.
Chef Tip: If you have time, let the mixture sit in the fridge for about 30 minutes to let the flavors meld together. -
Add the Zest and Cinnamon
Stir in the citrus zest and cinnamon. These ingredients will elevate the filling, giving it brightness and warmth.
Pro Tip: Use a microplane grater for zesting! It gets you that fine zest you’re looking for without any of the bitter pith. -
Fold in Chocolate Chips or Pistachios
Gently fold in half of your chocolate chips or pistachios. This step is vital; you want to incorporate them without losing the fluffiness of your filling.
Friendly Reminder: Taste the filling at this stage! Adjust sweetness or flavors to your liking. -
Fill the Pastry Shells
Take your mini pastry shells and carefully spoon in the ricotta mixture using a piping bag or a small spoon. Aim to fill each shell generously but avoid overstuffing to prevent any spills.
Kitchen Hack: If you don’t have a piping bag, a zip-top bag with a corner cut off works perfectly! -
Garnish and Dust
Once all the shells are filled, sprinkle the remaining chocolate chips or pistachios on top. Finish off with a light dusting of powdered sugar for that café-style finish—because who doesn’t love a good dusting of sweetness?
Final Touch: Adding a sprig of mint or a few edible flowers not only looks pretty but adds another layer of flavor. -
Chill Before Serving
Let the filled Mini Cannoli Cups sit in the fridge for at least 30 minutes. This not only helps the flavors unite but also makes the filling set a bit better.
Quick Note: These cuties can be prepped ahead of time, making them perfect for parties or gatherings!
Serving Suggestions
To serve your Mini Cannoli Cups, arrange them on a beautiful platter or tiered stand for a touch of elegance. Drizzle some chocolate sauce on the platter for a fancy flair, or serve them with fresh berries for that pop of color. These treats are great as a dessert after a delightful dinner or as a sweet addition to your brunch table!
Recipe Variations
Want to switch things up a bit? Here are a few variations to get those creative juices flowing:
-
Chocolate Lovers Variant: Mix cocoa powder into the ricotta for a chocolate cannoli filling. Add mini chocolate chips for extra indulgence!
-
Fruit-Inspired: Fold in some diced strawberries or blueberries into the filling for a fruity twist.
-
Nutty Delight: Use toasted hazelnuts instead of pistachios for a different nutty flavor.
-
Healthier Option: Substitute part of the ricotta with Greek yogurt to lower the fat content while still getting that creamy texture.
Chef’s Notes
Making these Mini Cannoli Cups has become a tradition in my kitchen. They’re perfect for celebrating special occasions, but let’s be real, I whip them up just because! Plus, they’re a great way to get friends and family involved. I can still hear the laughter as we experimented with different fillings and toppings while baking in my grandmother’s kitchen.
Just remember, it’s okay to make mistakes. Once, I added way too much lemon zest—which turned out to be a fun accident, because we ended up loving the zing it gave! Cooking isn’t just about following a recipe; it’s about creating memories and sharing moments with the people you love.
FAQs and Troubleshooting
1. Why is my ricotta filling grainy?
This can happen if the ricotta isn’t well blended. Use a fine mesh strainer or cheesecloth to drain excess moisture from the ricotta before mixing.
2. Can I make the pastry shells ahead of time?
Absolutely! You can make them a day in advance. Just keep them in an airtight container to maintain their crispness.
3. How long do the Mini Cannoli Cups last?
These little treats are best enjoyed fresh, but they can be stored in the fridge for up to 2 days. However, the pastry shells may soften over time.
4. What if I can’t find mini pastry shells?
No problem! You can use phyllo cups or make your own pastry dough and roll it into mini rounds, then bake them in mini muffin tins for a homemade option.
Nutritional Info
While I love indulging every now and then, here’s a rough overview of the nutritional info per Mini Cannoli Cup (keeping in mind actual values may vary based on ingredients):
- Calories: 100
- Protein: 2g
- Fat: 4g
- Carbohydrates: 14g
- Sugars: 6g
So there you have it! Mini Cannoli Cups that are simple to make, filled with delightful flavors, and perfect for any occasion—but most importantly, they bring joy to the table. I hope you find yourself whipping these up often and sharing them with your loved ones. Let’s celebrate food, fun, and fabulous flavor together! Happy cooking, friends!
PrintMini Cannoli Cups
These adorable Mini Cannoli Cups combine classic Italian flavors with the charm of mini pastry shells, offering a delightful bite-sized treat that’s perfect for any occasion.
- Prep Time: 15 minutes
- Cook Time: 15 minutes
- Total Time: 30 minutes
- Yield: 12 servings 1x
- Category: Dessert
- Method: Chilling and No-Bake
- Cuisine: Italian
- Diet: Vegetarian
Ingredients
- 1 cup ricotta cheese
- 1/2 cup powdered sugar
- 1/2 teaspoon citrus zest (lemon or orange)
- 1 package mini pastry shells
- 1/2 teaspoon cinnamon
- 1/4 cup chocolate chips or chopped pistachios
- Additional powdered sugar for dusting
Instructions
- Prep the filling: In a medium bowl, combine the ricotta cheese and powdered sugar. Using a spatula, mix until smooth and creamy.
- Add the zest and cinnamon: Stir in the citrus zest and cinnamon.
- Fold in the chocolate chips or pistachios: Gently fold in half of your chocolate chips or pistachios.
- Fill the pastry shells: Take your mini pastry shells and carefully spoon in the ricotta mixture.
- Garnish and dust: Once all the shells are filled, sprinkle the remaining chocolate chips or pistachios on top.
- Chill before serving: Let the filled Mini Cannoli Cups sit in the fridge for at least 30 minutes.
Notes
These Mini Cannoli Cups can be prepped ahead of time, making them perfect for parties or gatherings. Experiment with different fillings and toppings for variety!
Nutrition
- Serving Size: 1 serving
- Calories: 100 per cup
- Sugar: 6g
- Sodium: 50mg
- Fat: 4g
- Saturated Fat: 2g
- Unsaturated Fat: 2g
- Trans Fat: 0g
- Carbohydrates: 14g
- Fiber: 0g
- Protein: 2g
- Cholesterol: 10mg
Keywords: mini cannoli, Italian dessert, bite-sized dessert, sweet treats, quick dessert